StartOpenCloseTransation-创建一个 OpenCloseTransaction 对象,它的行为类似于 Transaction 对象,它包装了对象的 Open 和 Close 方法,使其更容易关闭所有打开的对象,而不必显式关闭每个打开的对象。建议在可能被调用未知次数的支持或实用程序函数中使用,并在处理大多数事件处理程序时使用。
using Autodesk.AutoCAD.Runtime; using Autodesk.AutoCAD.ApplicationServices; using Autodesk.AutoCAD.DatabaseServices; [CommandMethod("StartTransactionManager")] publicstaticvoidStartTransactionManager() { // Get the current document and database Document acDoc = Application.DocumentManager.MdiActiveDocument; Database acCurDb = acDoc.Database; // Start a transaction using (Transaction acTrans = acCurDb.TransactionManager.StartTransaction()) { // Open the Block table for read BlockTable acBlkTbl; acBlkTbl = acTrans.GetObject(acCurDb.BlockTableId, OpenMode.ForRead) as BlockTable; // Open the Block table record Model space for read BlockTableRecord acBlkTblRec; acBlkTblRec = acTrans.GetObject(acBlkTbl[BlockTableRecord.ModelSpace], OpenMode.ForRead) as BlockTableRecord; // Step through the Block table record foreach (ObjectId asObjId in acBlkTblRec) { acDoc.Editor.WriteMessage("\nDXF name: " + asObjId.ObjectClass.DxfName); acDoc.Editor.WriteMessage("\nObjectID: " + asObjId.ToString()); acDoc.Editor.WriteMessage("\nHandle: " + asObjId.Handle.ToString()); acDoc.Editor.WriteMessage("\n"); } // Dispose of the transaction } }
using Autodesk.AutoCAD.Runtime; using Autodesk.AutoCAD.ApplicationServices; using Autodesk.AutoCAD.DatabaseServices; using Autodesk.AutoCAD.Geometry; [CommandMethod("AddNewCircleTransaction")] publicstaticvoidAddNewCircleTransaction() { // Get the current document and database Document acDoc = Application.DocumentManager.MdiActiveDocument; Database acCurDb = acDoc.Database;
// Start a transaction using (Transaction acTrans = acCurDb.TransactionManager.StartOpenCloseTransaction()) { // Open the Block table for read BlockTable acBlkTbl; acBlkTbl = acTrans.GetObject(acCurDb.BlockTableId, OpenMode.ForRead) as BlockTable;
// Open the Block table record Model space for write BlockTableRecord acBlkTblRec; acBlkTblRec = acTrans.GetObject(acBlkTbl[BlockTableRecord.ModelSpace], OpenMode.ForWrite) as BlockTableRecord;
// Create a circle with a radius of 3 at 5,5 using (Circle acCirc = new Circle()) { acCirc.Center = new Point3d(5, 5, 0); acCirc.Radius = 3;
// Add the new object to Model space and the transaction acBlkTblRec.AppendEntity(acCirc); acTrans.AddNewlyCreatedDBObject(acCirc, true); }
// Commit the changes and dispose of the transaction acTrans.Commit(); } }
// Commit the changes made within the transaction <transaction>.Commit(); // Abort the transaction and rollback to the previous state <transaction>.Abort();
Dispose 对象(.NET)
在.NET中创建新对象时,必须通过处理过程和垃圾收集从内存中正确释放对象。你可以使用 Dispose 方法或 Using 语句来通知一个对象何时可以进行垃圾回收。在大多数情况下, Using 语句是首选方法,因为它在不再需要对象时进行适当的调用来关闭和释放对象。
// Dispose an object with the using statement using (<dataType> <object> = <value>) // Do something here } // Manually dispose of an object with the Dispose method <object>. Dispose ();
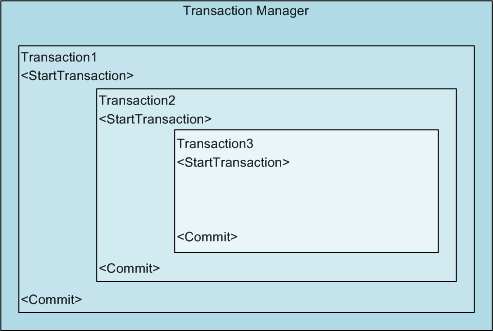
using Autodesk.AutoCAD.Runtime; using Autodesk.AutoCAD.ApplicationServices; using Autodesk.AutoCAD.DatabaseServices; using Autodesk.AutoCAD.Geometry; using Autodesk.AutoCAD.EditorInput; [CommandMethod("NestedTransactions")] publicstaticvoidNestedTransactions() { // Get the current document and database Document acDoc = Application.DocumentManager.MdiActiveDocument; Database acCurDb = acDoc.Database;
// Create a reference to the Transaction Manager Autodesk.AutoCAD.DatabaseServices.TransactionManager acTransMgr; acTransMgr = acCurDb.TransactionManager;
// Create a new transaction using (Transaction acTrans1 = acTransMgr.StartTransaction()) { // Print the current number of active transactions acDoc.Editor.WriteMessage("\nNumber of transactions active: " + acTransMgr.NumberOfActiveTransactions.ToString());
// Open the Block table for read BlockTable acBlkTbl; acBlkTbl = acTrans1.GetObject(acCurDb.BlockTableId, OpenMode.ForRead) as BlockTable;
// Open the Block table record Model space for write BlockTableRecord acBlkTblRec; acBlkTblRec = acTrans1.GetObject(acBlkTbl[BlockTableRecord.ModelSpace], OpenMode.ForWrite) as BlockTableRecord;
// Create a circle with a radius of 3 at 5,5 using (Circle acCirc = new Circle()) { acCirc.Center = new Point3d(5, 5, 0); acCirc.Radius = 3;
// Add the new object to Model space and the transaction acBlkTblRec.AppendEntity(acCirc); acTrans1.AddNewlyCreatedDBObject(acCirc, true);
// Create the second transaction using (Transaction acTrans2 = acTransMgr.StartTransaction()) { acDoc.Editor.WriteMessage("\nNumber of transactions active: " + acTransMgr.NumberOfActiveTransactions.ToString());
// Change the circle's color acCirc.ColorIndex = 5;
// Get the object that was added to Transaction 1 and set it to the color 5 using (Line acLine = new Line(new Point3d(2, 5, 0), new Point3d(10, 7, 0))) { acLine.ColorIndex = 3;
// Add the new object to Model space and the transaction acBlkTblRec.AppendEntity(acLine); acTrans2.AddNewlyCreatedDBObject(acLine, true); }
// Create the third transaction using (Transaction acTrans3 = acTransMgr.StartTransaction()) { acDoc.Editor.WriteMessage("\nNumber of transactions active: " + acTransMgr.NumberOfActiveTransactions.ToString());
// Change the circle's color acCirc.ColorIndex = 3;
// Update the display of the drawing acDoc.Editor.WriteMessage("\n"); acDoc.Editor.Regen();
// Request to keep or discard the changes in the third transaction PromptKeywordOptions pKeyOpts = new PromptKeywordOptions(""); pKeyOpts.Message = "\nKeep color change "; pKeyOpts.Keywords.Add("Yes"); pKeyOpts.Keywords.Add("No"); pKeyOpts.Keywords.Default = "No"; pKeyOpts.AllowNone = true;
if (pKeyRes.StringResult == "No") { // Discard the changes in transaction 3 acTrans3.Abort(); } else { // Save the changes in transaction 3 acTrans3.Commit(); }
// Dispose the transaction }
acDoc.Editor.WriteMessage("\nNumber of transactions active: " + acTransMgr.NumberOfActiveTransactions.ToString());
// Keep the changes to transaction 2 acTrans2.Commit(); } }
acDoc.Editor.WriteMessage("\nNumber of transactions active: " + acTransMgr.NumberOfActiveTransactions.ToString());
// Keep the changes to transaction 1 acTrans1.Commit(); } }
不使用事务管理器打开和关闭对象(.NET)
事务使打开和处理多个对象变得更容易,但它们不是打开和编辑对象的唯一方法。除了使用事务之外,您还可以使用 Open 和 Close 方法打开和关闭对象。您仍然需要获得对象ID才能使用 Open 方法。与transactions中使用的 GetObject 方法一样,您需要指定一个开放模式,并且返回值是一个对象。
如果您在使用 Open 方法打开对象后对其进行了更改,则可以使用 Cancel 方法回滚自打开对象以来所做的所有更改。 Cancel 必须在每个要回滚的对象上调用。在关闭对象后,还必须使用 Dispose 方法正确地释放对象,或者可以使用 Using 语句关闭和释放对象。
注意:对象必须与打开和关闭操作配对。如果你使用了没有 Using 语句的 Open 方法,你必须在一个打开的对象上调用 Close 或 Cancel 方法。如果无法关闭对象,将导致读取访问冲突,并导致AutoCAD变得不稳定。
如果您需要处理单个对象,与使用事务管理器相比,使用 Open 和 Close 方法可以减少您可能必须编写的代码行数。但是,建议使用事务来打开和关闭对象。
注意:使用事务时,不应直接使用 Open 和 Close 方法,因为事务管理器可能无法正确打开或关闭对象,这可能会导致AutoCAD变得不稳定。相反,使用 StartOpenCloseTransation 方法创建一个 OpenCloseTransaction 对象,它包装了 Open 和 Close 方法。
using Autodesk.AutoCAD.Runtime; using Autodesk.AutoCAD.ApplicationServices; using Autodesk.AutoCAD.DatabaseServices; [CommandMethod("OpenCloseObjectId")] publicstaticvoidOpenCloseObjectId() { // Get the current document and database Document acDoc = Application.DocumentManager.MdiActiveDocument; Database acCurDb = acDoc.Database;
// Open the Block table for read BlockTable acBlkTbl = null;
try { acBlkTbl = acCurDb.BlockTableId.Open(OpenMode.ForRead) as BlockTable;
// Open the Block table record Model space for read BlockTableRecord acBlkTblRec = null;
try { acBlkTblRec = acBlkTbl[BlockTableRecord.ModelSpace].Open(OpenMode.ForRead) as BlockTableRecord;
// Step through the Block table record foreach (ObjectId acObjId in acBlkTblRec) { acDoc.Editor.WriteMessage("\nDXF name: " + acObjId.ObjectClass.DxfName); acDoc.Editor.WriteMessage("\nObjectID: " + acObjId.ToString()); acDoc.Editor.WriteMessage("\nHandle: " + acObjId.Handle.ToString()); acDoc.Editor.WriteMessage("\n"); } } catch (Autodesk.AutoCAD.Runtime.Exception es) { System.Windows.Forms.MessageBox.Show(es.Message); } finally { // Close the Block table if (!acBlkTblRec.ObjectId.IsNull) { // Close the Block table record acBlkTblRec.Close(); acBlkTblRec.Dispose(); } } } catch (Autodesk.AutoCAD.Runtime.Exception es) { System.Windows.Forms.MessageBox.Show(es.Message); } finally { // Close the Block table if (!acBlkTbl.ObjectId.IsNull) { acBlkTbl.Close(); acBlkTbl.Dispose(); } } }
using Autodesk.AutoCAD.Runtime; using Autodesk.AutoCAD.ApplicationServices; using Autodesk.AutoCAD.DatabaseServices; [CommandMethod("OpenCloseObjectIdWithUsing")] publicstaticvoidOpenCloseObjectIdWithUsing() { // Get the current document and database Document acDoc = Application.DocumentManager.MdiActiveDocument; Database acCurDb = acDoc.Database;
// Open the Block table for read using (BlockTable acBlkTbl = acCurDb.BlockTableId.Open(OpenMode.ForRead) as BlockTable) { // Open the Block table record Model space for read using (BlockTableRecord acBlkTblRec = acBlkTbl[BlockTableRecord.ModelSpace].Open(OpenMode.ForRead) as BlockTableRecord) { // Step through the Block table record foreach (ObjectId acObjId in acBlkTblRec) { acDoc.Editor.WriteMessage("\nDXF name: " + acObjId.ObjectClass.DxfName); acDoc.Editor.WriteMessage("\nObjectID: " + acObjId.ToString()); acDoc.Editor.WriteMessage("\nHandle: " + acObjId.Handle.ToString()); acDoc.Editor.WriteMessage("\n"); }
using Autodesk.AutoCAD.Runtime; using Autodesk.AutoCAD.ApplicationServices; using Autodesk.AutoCAD.DatabaseServices; using Autodesk.AutoCAD.Geometry; [CommandMethod("AddNewCircleOpenClose")] publicstaticvoidAddNewCircleOpenClose() { // Get the current document and database Document acDoc = Application.DocumentManager.MdiActiveDocument; Database acCurDb = acDoc.Database;
// Open the Block table for read using (BlockTable acBlkTbl = acCurDb.BlockTableId.Open(OpenMode.ForRead) as BlockTable) { // Open the Block table record Model space for write using (BlockTableRecord acBlkTblRec = acBlkTbl[BlockTableRecord.ModelSpace].Open(OpenMode.ForWrite) as BlockTableRecord) { // Create a circle with a radius of 3 at 5,5 using (Circle acCirc = new Circle()) { acCirc.Center = new Point3d(5, 5, 0); acCirc.Radius = 3;
// Add the new object to Model space and the transaction acBlkTblRec.AppendEntity(acCirc);
using Autodesk.AutoCAD.Runtime; using Autodesk.AutoCAD.ApplicationServices; using Autodesk.AutoCAD.DatabaseServices; [CommandMethod("FreezeDoorLayer")] publicstaticvoidFreezeDoorLayer() { // Get the current document and database Document acDoc = Application.DocumentManager.MdiActiveDocument; Database acCurDb = acDoc.Database;
// Start a transaction using (Transaction acTrans = acCurDb.TransactionManager.StartTransaction()) { // Open the Layer table for read LayerTable acLyrTbl; acLyrTbl = acTrans.GetObject(acCurDb.LayerTableId, OpenMode.ForRead) as LayerTable;
// Step through each layer and update those that start with 'Door' foreach (ObjectId acObjId in acLyrTbl) { // Open the Layer table record for read LayerTableRecord acLyrTblRec; acLyrTblRec = acTrans.GetObject(acObjId, OpenMode.ForRead) as LayerTableRecord;
// Check to see if the layer's name starts with 'Door' if (acLyrTblRec.Name.StartsWith("Door", StringComparison.OrdinalIgnoreCase) == true) { // Check to see if the layer is current, if so then do not freeze it if (acLyrTblRec.ObjectId != acCurDb.Clayer) { // Change from read to write mode acTrans.GetObject(acObjId, OpenMode.ForWrite);
// Freeze the layer acLyrTblRec.IsFrozen = true; } } }
// Commit the changes and dispose of the transaction acTrans.Commit(); } }
// Reference an element directly from a collection dynamic acCurDb = HostApplicationServices.WorkingDatabase; dynamic acBlkTbl = acCurDb.BlockTableId; dynamic acMSpace = acBlkTbl[BlockTableRecord.ModelSpace];
var layers = db.LayerTableId; for (int i = 0; i < 2; i++) { var newrec = layers.Add(new LayerTableRecord()); newrec.Name = "Layer" + i.ToString(); if (i == 0) newrec.IsFrozen = true; if (i == 1) newrec.IsOff = true; }
var OffLayers = from l in (IEnumerable<dynamic>)layers where l.IsOff select l;
doc.Editor.WriteMessage("\nLayers Turned Off:");
foreach (dynamic rec in OffLayers) doc.Editor.WriteMessage("\n - " + rec.Name);
var frozenOrOffNames = from l in (IEnumerable<dynamic>)layers where l.IsFrozen == true || l.IsOff == true select l;
doc.Editor.WriteMessage("\nLayers Frozen or Turned Off:");
[CommandMethod("ADDLINE")] publicstaticvoidAddLine() { // Get the current database Database acCurDb = HostApplicationServices.WorkingDatabase;
// Start a transaction using (Transaction acTrans = acCurDb.TransactionManager.StartTransaction()) { // Open the Block table for read BlockTable acBlkTbl; acBlkTbl = acTrans.GetObject(acCurDb.BlockTableId, OpenMode.ForRead) as BlockTable;
// Open the Block table record Model space for write BlockTableRecord acBlkTblRec; acBlkTblRec = acTrans.GetObject(acBlkTbl[BlockTableRecord.ModelSpace], OpenMode.ForWrite) as BlockTableRecord;
// Create a line that starts at 5,5 and ends at 12,3 using (Line acLine = new Line(new Point3d(5, 5, 0), new Point3d(12, 3, 0))) { // Add the new object to the block table record and the transaction acBlkTblRec.AppendEntity(acLine); acTrans.AddNewlyCreatedDBObject(acLine, true); }
// Save the new object to the database acTrans.Commit(); } }
C#动态语言(DLR)
1 2 3 4 5 6 7 8 9 10 11 12 13 14 15 16
[CommandMethod("ADDLINE")] publicstaticvoidAddLine() { // Get the current database dynamic acCurDb = HostApplicationServices.WorkingDatabase;
// Create a dynamic reference to model or paper space dynamic acSpace = acCurDb.CurrentSpaceId;
// Create a line that starts at 5,5 and ends at 12,3 dynamic acLine = new Line(new Point3d(5, 5, 0), new Point3d(12, 3, 0));
// Add the new object to the current space acSpace.AppendEntity(acLine); }
[CommandMethod("ADDLAYER")] publicstaticvoidAddLayer() { // Get the current database Database acCurDb = HostApplicationServices.WorkingDatabase;
using (Transaction acTrans = acCurDb.TransactionManager.StartTransaction()) { // Returns the layer table for the current database LayerTable acLyrTbl; acLyrTbl = acTrans.GetObject(acCurDb.LayerTableId, OpenMode.ForRead) as LayerTable;
// Check to see if MyLayer exists in the Layer table if (acLyrTbl.Has("MyLayer") != true) { // Open the Layer Table for write acTrans.GetObject(acCurDb.LayerTableId, OpenMode.ForWrite);
// Create a new layer named "MyLayer" using (LayerTableRecord acLyrTblRec = new LayerTableRecord()) { acLyrTblRec.Name = "MyLayer";
// Assign the ACI color 3 to the new layer Color acClr = Color.FromColorIndex(ColorMethod.ByAci, 3); acLyrTblRec.Color = acClr;
// Add the new layer table record to the layer table and the transaction acLyrTbl.Add(acLyrTblRec); acTrans.AddNewlyCreatedDBObject(acLyrTblRec, true); }
[CommandMethod("ADDLAYER")] publicstaticvoidAddLayer() { // Get the current database dynamic acCurDb = HostApplicationServices.WorkingDatabase;
dynamic acLyrTbl = acCurDb.LayerTableId;
// Check to see if MyLayer exists in the Layer table if (acLyrTbl.Has("MyLayer") != true) { // Create a new layer named "MyLayer" dynamic acLyrTblRec = new LayerTableRecord(); acLyrTblRec.Name = "MyLayer";
// Assign the ACI color 3 to the new layer dynamic acClr = Color.FromColorIndex(ColorMethod.ByAci, 3); acLyrTblRec.Color = acClr;
// Add the new layer table record to the layer table acLyrTbl.Add(acLyrTblRec); } }
[CommandMethod("LISTOBJECTS")] publicstaticvoidListObjects() { // Get the current document and database Document acDoc = Application.DocumentManager.MdiActiveDocument; Database acCurDb = HostApplicationServices.WorkingDatabase;
using (Transaction acTrans = acCurDb.TransactionManager.StartTransaction()) { // Open the Block table record Model space for write BlockTableRecord acSpace; acSpace = acTrans.GetObject(acCurDb.CurrentSpaceId, OpenMode.ForRead) as BlockTableRecord;
// Step through the current space foreach (ObjectId objId in acSpace) { // Display the class and current layer of the object Entity acEnt = (Entity)acTrans.GetObject(objId, OpenMode.ForRead); acDoc.Editor.WriteMessage("\nObject Class: " + acEnt.GetRXClass().Name + "\nCurrent Layer: " + acEnt.Layer + "\n"); } acTrans.Commit(); } }
C#动态语言(DLR)
1 2 3 4 5 6 7 8 9 10 11 12 13 14 15 16 17 18 19
[CommandMethod("LISTOBJECTS")] publicstaticvoidListObjects() { // Get the current document and database dynamic acDoc = Application.DocumentManager.MdiActiveDocument; dynamic acCurDb = HostApplicationServices.WorkingDatabase;
// Create a dynamic reference to model or paper space dynamic acSpace = acCurDb.CurrentSpaceId;
// Step through the current space foreach (dynamic acEnt in acSpace) { // Display the class and current layer of the object acDoc.Editor.WriteMessage("\nObject Class: " + acEnt.GetRXClass().Name + "\nCurrent Layer: " + acEnt.Layer + "\n"); } }
using Autodesk.AutoCAD.Runtime; using Autodesk.AutoCAD.ApplicationServices; using Autodesk.AutoCAD.DatabaseServices; using Autodesk.AutoCAD.Geometry; using Autodesk.AutoCAD.EditorInput; [CommandMethod("AccessSpace")] publicstaticvoidAccessSpace() { // Get the current document and database Document acDoc = Application.DocumentManager.MdiActiveDocument; Database acCurDb = acDoc.Database;
// Start a transaction using (Transaction acTrans = acCurDb.TransactionManager.StartTransaction()) { // Open the Block table for read BlockTable acBlkTbl; acBlkTbl = acTrans.GetObject(acCurDb.BlockTableId, OpenMode.ForRead) as BlockTable;
// Open the Block table record for read BlockTableRecord acBlkTblRec;
// Request which table record to open PromptKeywordOptions pKeyOpts = new PromptKeywordOptions(""); pKeyOpts.Message = "\nEnter which space to create the line in "; pKeyOpts.Keywords.Add("Model"); pKeyOpts.Keywords.Add("Paper"); pKeyOpts.Keywords.Add("Current"); pKeyOpts.AllowNone = false; pKeyOpts.AppendKeywordsToMessage = true;
if (pKeyRes.StringResult == "Model") { // Get the ObjectID for Model space from the Block table acBlkTblRec = acTrans.GetObject(acBlkTbl[BlockTableRecord.ModelSpace], OpenMode.ForWrite) as BlockTableRecord; } elseif (pKeyRes.StringResult == "Paper") { // Get the ObjectID for Paper space from the Block table acBlkTblRec = acTrans.GetObject(acBlkTbl[BlockTableRecord.PaperSpace], OpenMode.ForWrite) as BlockTableRecord; } else { // Get the ObjectID for the current space from the database acBlkTblRec = acTrans.GetObject(acCurDb.CurrentSpaceId, OpenMode.ForWrite) as BlockTableRecord; }
// Create a line that starts at 2,5 and ends at 10,7 using (Line acLine = new Line(new Point3d(2, 5, 0), new Point3d(10, 7, 0))) { // Add the new object to the block table record and the transaction acBlkTblRec.AppendEntity(acLine); acTrans.AddNewlyCreatedDBObject(acLine, true); }
// Save the new line to the database acTrans.Commit(); } }
using Autodesk.AutoCAD.Runtime; using Autodesk.AutoCAD.ApplicationServices; using Autodesk.AutoCAD.DatabaseServices; using Autodesk.AutoCAD.Geometry; [CommandMethod("AddLine")] publicstaticvoidAddLine() { // Get the current document and database Document acDoc = Application.DocumentManager.MdiActiveDocument; Database acCurDb = acDoc.Database;
// Start a transaction using (Transaction acTrans = acCurDb.TransactionManager.StartTransaction()) { // Open the Block table for read BlockTable acBlkTbl; acBlkTbl = acTrans.GetObject(acCurDb.BlockTableId, OpenMode.ForRead) as BlockTable;
// Open the Block table record Model space for write BlockTableRecord acBlkTblRec; acBlkTblRec = acTrans.GetObject(acBlkTbl[BlockTableRecord.ModelSpace], OpenMode.ForWrite) as BlockTableRecord;
// Create a line that starts at 5,5 and ends at 12,3 using (Line acLine = new Line(new Point3d(5, 5, 0), new Point3d(12, 3, 0))) {
// Add the new object to the block table record and the transaction acBlkTblRec.AppendEntity(acLine); acTrans.AddNewlyCreatedDBObject(acLine, true); }
// Save the new object to the database acTrans.Commit(); } }
[CommandMethod("AddLightweightPolyline")] publicstaticvoidAddLightweightPolyline() { // Get the current document and database Document acDoc = Application.DocumentManager.MdiActiveDocument; Database acCurDb = acDoc.Database;
// Start a transaction using (Transaction acTrans = acCurDb.TransactionManager.StartTransaction()) { // Open the Block table for read BlockTable acBlkTbl; acBlkTbl = acTrans.GetObject(acCurDb.BlockTableId, OpenMode.ForRead) as BlockTable;
// Open the Block table record Model space for write BlockTableRecord acBlkTblRec; acBlkTblRec = acTrans.GetObject(acBlkTbl[BlockTableRecord.ModelSpace], OpenMode.ForWrite) as BlockTableRecord;
// Create a polyline with two segments (3 points) using (Polyline acPoly = new Polyline()) { acPoly.AddVertexAt(0, new Point2d(2, 4), 0, 0, 0); acPoly.AddVertexAt(1, new Point2d(4, 2), 0, 0, 0); acPoly.AddVertexAt(2, new Point2d(6, 4), 0, 0, 0);
// Add the new object to the block table record and the transaction acBlkTblRec.AppendEntity(acPoly); acTrans.AddNewlyCreatedDBObject(acPoly, true); }
// Save the new object to the database acTrans.Commit(); } }
using Autodesk.AutoCAD.Runtime; using Autodesk.AutoCAD.ApplicationServices; using Autodesk.AutoCAD.DatabaseServices; using Autodesk.AutoCAD.Geometry; [CommandMethod("AddCircle")] publicstaticvoidAddCircle() { // Get the current document and database Document acDoc = Application.DocumentManager.MdiActiveDocument; Database acCurDb = acDoc.Database;
// Start a transaction using (Transaction acTrans = acCurDb.TransactionManager.StartTransaction()) { // Open the Block table for read BlockTable acBlkTbl; acBlkTbl = acTrans.GetObject(acCurDb.BlockTableId, OpenMode.ForRead) as BlockTable;
// Open the Block table record Model space for write BlockTableRecord acBlkTblRec; acBlkTblRec = acTrans.GetObject(acBlkTbl[BlockTableRecord.ModelSpace], OpenMode.ForWrite) as BlockTableRecord;
// Create a circle that is at 2,3 with a radius of 4.25 using (Circle acCirc = new Circle()) { acCirc.Center = new Point3d(2, 3, 0); acCirc.Radius = 4.25;
// Add the new object to the block table record and the transaction acBlkTblRec.AppendEntity(acCirc); acTrans.AddNewlyCreatedDBObject(acCirc, true); }
// Save the new object to the database acTrans.Commit(); } }
using Autodesk.AutoCAD.Runtime; using Autodesk.AutoCAD.ApplicationServices; using Autodesk.AutoCAD.DatabaseServices; using Autodesk.AutoCAD.Geometry; [CommandMethod("AddArc")] publicstaticvoidAddArc() { // Get the current document and database Document acDoc = Application.DocumentManager.MdiActiveDocument; Database acCurDb = acDoc.Database;
// Start a transaction using (Transaction acTrans = acCurDb.TransactionManager.StartTransaction()) { // Open the Block table for read BlockTable acBlkTbl; acBlkTbl = acTrans.GetObject(acCurDb.BlockTableId, OpenMode.ForRead) as BlockTable;
// Open the Block table record Model space for write BlockTableRecord acBlkTblRec; acBlkTblRec = acTrans.GetObject(acBlkTbl[BlockTableRecord.ModelSpace], OpenMode.ForWrite) as BlockTableRecord;
// Create an arc that is at 6.25,9.125 with a radius of 6, and // starts at 64 degrees and ends at 204 degrees using (Arc acArc = new Arc(new Point3d(6.25, 9.125, 0), 6, 1.117, 3.5605)) {
// Add the new object to the block table record and the transaction acBlkTblRec.AppendEntity(acArc); acTrans.AddNewlyCreatedDBObject(acArc, true); }
// Save the new line to the database acTrans.Commit(); } }
using Autodesk.AutoCAD.Runtime; using Autodesk.AutoCAD.ApplicationServices; using Autodesk.AutoCAD.DatabaseServices; using Autodesk.AutoCAD.Geometry; [CommandMethod("AddSpline")] publicstaticvoidAddSpline() { // Get the current document and database Document acDoc = Application.DocumentManager.MdiActiveDocument; Database acCurDb = acDoc.Database;
// Start a transaction using (Transaction acTrans = acCurDb.TransactionManager.StartTransaction()) { // Open the Block table for read BlockTable acBlkTbl; acBlkTbl = acTrans.GetObject(acCurDb.BlockTableId, OpenMode.ForRead) as BlockTable;
// Open the Block table record Model space for write BlockTableRecord acBlkTblRec; acBlkTblRec = acTrans.GetObject(acBlkTbl[BlockTableRecord.ModelSpace], OpenMode.ForWrite) as BlockTableRecord;
// Define the fit points for the spline Point3dCollection ptColl = new Point3dCollection(); ptColl.Add(new Point3d(0, 0, 0)); ptColl.Add(new Point3d(5, 5, 0)); ptColl.Add(new Point3d(10, 0, 0));
// Get a 3D vector from the point (0.5,0.5,0) Vector3d vecTan = new Point3d(0.5, 0.5, 0).GetAsVector();
// Create a spline through (0, 0, 0), (5, 5, 0), and (10, 0, 0) with a // start and end tangency of (0.5, 0.5, 0.0) using (Spline acSpline = new Spline(ptColl, vecTan, vecTan, 4, 0.0)) { // Add the new object to the block table record and the transaction acBlkTblRec.AppendEntity(acSpline); acTrans.AddNewlyCreatedDBObject(acSpline, true); }
// Save the new line to the database acTrans.Commit(); } }
创建点对象(.NET)
Point 对象可能很有用,例如,作为节点或参照点,可以捕捉到这些点或从这些点偏移对象。可以设置点的样式及其相对于屏幕的大小或以绝对单位设置。
using Autodesk.AutoCAD.Runtime; using Autodesk.AutoCAD.ApplicationServices; using Autodesk.AutoCAD.DatabaseServices; using Autodesk.AutoCAD.Geometry; [CommandMethod("AddPointAndSetPointStyle")] publicstaticvoidAddPointAndSetPointStyle() { // Get the current document and database Document acDoc = Application.DocumentManager.MdiActiveDocument; Database acCurDb = acDoc.Database;
// Start a transaction using (Transaction acTrans = acCurDb.TransactionManager.StartTransaction()) { // Open the Block table for read BlockTable acBlkTbl; acBlkTbl = acTrans.GetObject(acCurDb.BlockTableId, OpenMode.ForRead) as BlockTable;
// Open the Block table record Model space for write BlockTableRecord acBlkTblRec; acBlkTblRec = acTrans.GetObject(acBlkTbl[BlockTableRecord.ModelSpace], OpenMode.ForWrite) as BlockTableRecord;
// Create a point at (4, 3, 0) in Model space using (DBPoint acPoint = new DBPoint(new Point3d(4, 3, 0))) { // Add the new object to the block table record and the transaction acBlkTblRec.AppendEntity(acPoint); acTrans.AddNewlyCreatedDBObject(acPoint, true); }
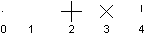
// Set the style for all point objects in the drawing acCurDb.Pdmode = 34; acCurDb.Pdsize = 1;
// Save the new object to the database acTrans.Commit(); } }
using Autodesk.AutoCAD.Runtime; using Autodesk.AutoCAD.ApplicationServices; using Autodesk.AutoCAD.DatabaseServices; using Autodesk.AutoCAD.Geometry; [CommandMethod("Add2DSolid")] publicstaticvoidAdd2DSolid() { // Get the current document and database Document acDoc = Application.DocumentManager.MdiActiveDocument; Database acCurDb = acDoc.Database;
// Start a transaction using (Transaction acTrans = acCurDb.TransactionManager.StartTransaction()) { // Open the Block table for read BlockTable acBlkTbl; acBlkTbl = acTrans.GetObject(acCurDb.BlockTableId, OpenMode.ForRead) as BlockTable;
// Open the Block table record Model space for write BlockTableRecord acBlkTblRec; acBlkTblRec = acTrans.GetObject(acBlkTbl[BlockTableRecord.ModelSpace], OpenMode.ForWrite) as BlockTableRecord;
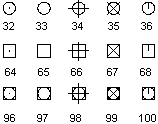
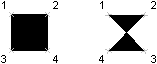
// Create a quadrilateral (bow-tie) solid in Model space using (Solid ac2DSolidBow = new Solid(new Point3d(0, 0, 0), new Point3d(5, 0, 0), new Point3d(5, 8, 0), new Point3d(0, 8, 0))) { // Add the new object to the block table record and the transaction acBlkTblRec.AppendEntity(ac2DSolidBow); acTrans.AddNewlyCreatedDBObject(ac2DSolidBow, true); }
// Create a quadrilateral (square) solid in Model space using (Solid ac2DSolidSqr = new Solid(new Point3d(10, 0, 0), new Point3d(15, 0, 0), new Point3d(10, 8, 0), new Point3d(15, 8, 0))) { // Add the new object to the block table record and the transaction acBlkTblRec.AppendEntity(ac2DSolidSqr); acTrans.AddNewlyCreatedDBObject(ac2DSolidSqr, true); }
// Save the new object to the database acTrans.Commit(); } }
using Autodesk.AutoCAD.Runtime; using Autodesk.AutoCAD.ApplicationServices; using Autodesk.AutoCAD.DatabaseServices; using Autodesk.AutoCAD.Geometry; [CommandMethod("AddRegion")] publicstaticvoidAddRegion() { // Get the current document and database Document acDoc = Application.DocumentManager.MdiActiveDocument; Database acCurDb = acDoc.Database;
// Start a transaction using (Transaction acTrans = acCurDb.TransactionManager.StartTransaction()) { // Open the Block table for read BlockTable acBlkTbl; acBlkTbl = acTrans.GetObject(acCurDb.BlockTableId, OpenMode.ForRead) as BlockTable;
// Open the Block table record Model space for write BlockTableRecord acBlkTblRec; acBlkTblRec = acTrans.GetObject(acBlkTbl[BlockTableRecord.ModelSpace], OpenMode.ForWrite) as BlockTableRecord;
// Create an in memory circle using (Circle acCirc = new Circle()) { acCirc.Center = new Point3d(2, 2, 0); acCirc.Radius = 5;
// Adds the circle to an object array DBObjectCollection acDBObjColl = new DBObjectCollection(); acDBObjColl.Add(acCirc);
// Calculate the regions based on each closed loop DBObjectCollection myRegionColl = new DBObjectCollection(); myRegionColl = Region.CreateFromCurves(acDBObjColl); Region acRegion = myRegionColl[0] as Region;
// Add the new object to the block table record and the transaction acBlkTblRec.AppendEntity(acRegion); acTrans.AddNewlyCreatedDBObject(acRegion, true);
// Dispose of the in memory circle not appended to the database }
// Save the new object to the database acTrans.Commit(); } }
using Autodesk.AutoCAD.Runtime; using Autodesk.AutoCAD.ApplicationServices; using Autodesk.AutoCAD.DatabaseServices; using Autodesk.AutoCAD.Geometry; [CommandMethod("CreateCompositeRegions")] publicstaticvoidCreateCompositeRegions() { // Get the current document and database Document acDoc = Application.DocumentManager.MdiActiveDocument; Database acCurDb = acDoc.Database;
// Start a transaction using (Transaction acTrans = acCurDb.TransactionManager.StartTransaction()) { // Open the Block table for read BlockTable acBlkTbl; acBlkTbl = acTrans.GetObject(acCurDb.BlockTableId, OpenMode.ForRead) as BlockTable;
// Open the Block table record Model space for write BlockTableRecord acBlkTblRec; acBlkTblRec = acTrans.GetObject(acBlkTbl[BlockTableRecord.ModelSpace], OpenMode.ForWrite) as BlockTableRecord;
// Create two in memory circles using (Circle acCirc1 = new Circle()) { acCirc1.Center = new Point3d(4, 4, 0); acCirc1.Radius = 2;
using (Circle acCirc2 = new Circle()) { acCirc2.Center = new Point3d(4, 4, 0); acCirc2.Radius = 1;
// Adds the circle to an object array DBObjectCollection acDBObjColl = new DBObjectCollection(); acDBObjColl.Add(acCirc1); acDBObjColl.Add(acCirc2);
// Calculate the regions based on each closed loop DBObjectCollection myRegionColl = new DBObjectCollection(); myRegionColl = Region.CreateFromCurves(acDBObjColl); Region acRegion1 = myRegionColl[0] as Region; Region acRegion2 = myRegionColl[1] as Region;
// Subtract region 1 from region 2 if (acRegion1.Area > acRegion2.Area) { // Subtract the smaller region from the larger one acRegion1.BooleanOperation(BooleanOperationType.BoolSubtract, acRegion2); acRegion2.Dispose();
// Add the final region to the database acBlkTblRec.AppendEntity(acRegion1); acTrans.AddNewlyCreatedDBObject(acRegion1, true); } else { // Subtract the smaller region from the larger one acRegion2.BooleanOperation(BooleanOperationType.BoolSubtract, acRegion1); acRegion1.Dispose();
// Add the final region to the database acBlkTblRec.AppendEntity(acRegion2); acTrans.AddNewlyCreatedDBObject(acRegion2, true); }
// Dispose of the in memory objects not appended to the database } }
// Save the new object to the database acTrans.Commit(); } }
using Autodesk.AutoCAD.Runtime; using Autodesk.AutoCAD.ApplicationServices; using Autodesk.AutoCAD.DatabaseServices; using Autodesk.AutoCAD.Geometry; [CommandMethod("AddHatch")] publicstaticvoidAddHatch() { // Get the current document and database Document acDoc = Application.DocumentManager.MdiActiveDocument; Database acCurDb = acDoc.Database;
// Start a transaction using (Transaction acTrans = acCurDb.TransactionManager.StartTransaction()) { // Open the Block table for read BlockTable acBlkTbl; acBlkTbl = acTrans.GetObject(acCurDb.BlockTableId, OpenMode.ForRead) as BlockTable;
// Open the Block table record Model space for write BlockTableRecord acBlkTblRec; acBlkTblRec = acTrans.GetObject(acBlkTbl[BlockTableRecord.ModelSpace], OpenMode.ForWrite) as BlockTableRecord;
// Create a circle object for the closed boundary to hatch using (Circle acCirc = new Circle()) { acCirc.Center = new Point3d(3, 3, 0); acCirc.Radius = 1;
// Add the new circle object to the block table record and the transaction acBlkTblRec.AppendEntity(acCirc); acTrans.AddNewlyCreatedDBObject(acCirc, true);
// Adds the circle to an object id array ObjectIdCollection acObjIdColl = new ObjectIdCollection(); acObjIdColl.Add(acCirc.ObjectId);
// Create the hatch object and append it to the block table record using (Hatch acHatch = new Hatch()) { acBlkTblRec.AppendEntity(acHatch); acTrans.AddNewlyCreatedDBObject(acHatch, true);
// Set the properties of the hatch object // Associative must be set after the hatch object is appended to the // block table record and before AppendLoop acHatch.SetHatchPattern(HatchPatternType.PreDefined, "ANSI31"); acHatch.Associative = true; acHatch.AppendLoop(HatchLoopTypes.Outermost, acObjIdColl); acHatch.EvaluateHatch(true); } }
// Save the new object to the database acTrans.Commit(); } }
using Autodesk.AutoCAD.Runtime; using Autodesk.AutoCAD.ApplicationServices; using Autodesk.AutoCAD.DatabaseServices; using Autodesk.AutoCAD.EditorInput; [CommandMethod("CheckForPickfirstSelection", CommandFlags.UsePickSet)] publicstaticvoidCheckForPickfirstSelection() { // Get the current document Editor acDocEd = Application.DocumentManager.MdiActiveDocument.Editor;
// Get the PickFirst selection set PromptSelectionResult acSSPrompt; acSSPrompt = acDocEd.SelectImplied();
SelectionSet acSSet;
// If the prompt status is OK, objects were selected before // the command was started if (acSSPrompt.Status == PromptStatus.OK) { acSSet = acSSPrompt.Value;
Application.ShowAlertDialog("Number of objects in Pickfirst selection: " + acSSet.Count.ToString()); } else { Application.ShowAlertDialog("Number of objects in Pickfirst selection: 0"); }
// Clear the PickFirst selection set ObjectId[] idarrayEmpty = new ObjectId[0]; acDocEd.SetImpliedSelection(idarrayEmpty);
// Request for objects to be selected in the drawing area acSSPrompt = acDocEd.GetSelection();
// If the prompt status is OK, objects were selected if (acSSPrompt.Status == PromptStatus.OK) { acSSet = acSSPrompt.Value;
Application.ShowAlertDialog("Number of objects selected: " + acSSet.Count.ToString()); } else { Application.ShowAlertDialog("Number of objects selected: 0"); } }
using Autodesk.AutoCAD.Runtime; using Autodesk.AutoCAD.ApplicationServices; using Autodesk.AutoCAD.DatabaseServices; using Autodesk.AutoCAD.EditorInput; [CommandMethod("SelectObjectsOnscreen")] publicstaticvoidSelectObjectsOnscreen() { // Get the current document and database Document acDoc = Application.DocumentManager.MdiActiveDocument; Database acCurDb = acDoc.Database;
// Start a transaction using (Transaction acTrans = acCurDb.TransactionManager.StartTransaction()) { // Request for objects to be selected in the drawing area PromptSelectionResult acSSPrompt = acDoc.Editor.GetSelection();
// If the prompt status is OK, objects were selected if (acSSPrompt.Status == PromptStatus.OK) { SelectionSet acSSet = acSSPrompt.Value;
// Step through the objects in the selection set foreach (SelectedObject acSSObj in acSSet) { // Check to make sure a valid SelectedObject object was returned if (acSSObj != null) { // Open the selected object for write Entity acEnt = acTrans.GetObject(acSSObj.ObjectId, OpenMode.ForWrite) as Entity;
if (acEnt != null) { // Change the object's color to Green acEnt.ColorIndex = 3; } } }
// Save the new object to the database acTrans.Commit(); }
using Autodesk.AutoCAD.Runtime; using Autodesk.AutoCAD.ApplicationServices; using Autodesk.AutoCAD.DatabaseServices; using Autodesk.AutoCAD.Geometry; using Autodesk.AutoCAD.EditorInput; [CommandMethod("SelectObjectsByCrossingWindow")] publicstaticvoidSelectObjectsByCrossingWindow() { // Get the current document editor Editor acDocEd = Application.DocumentManager.MdiActiveDocument.Editor;
// Create a crossing window from (2,2,0) to (10,8,0) PromptSelectionResult acSSPrompt; acSSPrompt = acDocEd.SelectCrossingWindow(new Point3d(2, 2, 0), new Point3d(10, 8, 0));
// If the prompt status is OK, objects were selected if (acSSPrompt.Status == PromptStatus.OK) { SelectionSet acSSet = acSSPrompt.Value;
Application.ShowAlertDialog("Number of objects selected: " + acSSet.Count.ToString()); } else { Application.ShowAlertDialog("Number of objects selected: 0"); } }
privatestaticvoidSelectionKeywordInputHandler(object sender, SelectionTextInputEventArgs eSelectionInput) { // Gets the current document editor and define other variables for the current scope Editor acDocEd = Application.DocumentManager.MdiActiveDocument.Editor; PromptSelectionResult acSSPrompt = null; SelectionSet acSSet = null; ObjectId[] acObjIds = null;
// See if the user choose the myFence keyword switch (eSelectionInput.Input) { case"myFence": // Uses the four points to define a fence selection Point3dCollection ptsFence = new Point3dCollection(); ptsFence.Add(new Point3d(5.0, 5.0, 0.0)); ptsFence.Add(new Point3d(13.0, 15.0, 0.0)); ptsFence.Add(new Point3d(12.0, 9.0, 0.0)); ptsFence.Add(new Point3d(5.0, 5.0, 0.0));
acSSPrompt = acDocEd.SelectFence(ptsFence); break; case"myWindow": // Defines a rectangular window selection acSSPrompt = acDocEd.SelectWindow(new Point3d(1.0, 1.0, 0.0), new Point3d(30.0, 20.0, 0.0)); break; case"myWPoly": // Uses the four points to define a polygon window selection Point3dCollection ptsPolygon = new Point3dCollection(); ptsPolygon.Add(new Point3d(5.0, 5.0, 0.0)); ptsPolygon.Add(new Point3d(13.0, 15.0, 0.0)); ptsPolygon.Add(new Point3d(12.0, 9.0, 0.0)); ptsPolygon.Add(new Point3d(5.0, 5.0, 0.0));
acSSPrompt = acDocEd.SelectWindowPolygon(ptsPolygon); break; case"myLastSel": // Gets the last object created acSSPrompt = acDocEd.SelectLast(); break; case"myPrevSel": // Gets the previous object selection set acSSPrompt = acDocEd.SelectPrevious(); break; }
// If the prompt status is OK, objects were selected and return if (acSSPrompt != null) { if (acSSPrompt.Status == PromptStatus.OK) { // Objects were selected, so add them to the current selection acSSet = acSSPrompt.Value; acObjIds = acSSet.GetObjectIds(); eSelectionInput.AddObjects(acObjIds); } } }
[CommandMethod("SelectionKeywordInput")] publicstaticvoidSelectionKeywordInput() { // Gets the current document editor Editor acDocEd = Application.DocumentManager.MdiActiveDocument.Editor;
// Setups the keyword options PromptSelectionOptions acKeywordOpts = new PromptSelectionOptions(); acKeywordOpts.Keywords.Add("myFence"); acKeywordOpts.Keywords.Add("myWindow"); acKeywordOpts.Keywords.Add("myWPoly"); acKeywordOpts.Keywords.Add("myLastSel"); acKeywordOpts.Keywords.Add("myPrevSel");
// Adds the event handler for keyword input acKeywordOpts.KeywordInput += new SelectionTextInputEventHandler(SelectionKeywordInputHandler);
// Prompts the user for a selection set PromptSelectionResult acSSPrompt = acDocEd.GetSelection(acKeywordOpts);
// If the prompt status is OK, objects were selected if (acSSPrompt.Status == PromptStatus.OK) { // Gets the selection set SelectionSet acSSet = acSSPrompt.Value;
// Gets the objects from the selection set ObjectId[] acObjIds = acSSet.GetObjectIds(); Database acCurDb = Application.DocumentManager.MdiActiveDocument.Database;
// Starts a transaction using (Transaction acTrans = acCurDb.TransactionManager.StartTransaction()) { try { // Gets information about each object foreach (ObjectId acObjId in acObjIds) { Entity acEnt = (Entity)acTrans.GetObject(acObjId, OpenMode.ForWrite, true); acDocEd.WriteMessage("\nObject selected: " + acEnt.GetType().FullName);
} } finally { acTrans.Dispose(); } } }
// Removes the event handler for keyword input acKeywordOpts.KeywordInput -= new SelectionTextInputEventHandler(SelectionKeywordInputHandler); }
using Autodesk.AutoCAD.Runtime; using Autodesk.AutoCAD.ApplicationServices; using Autodesk.AutoCAD.DatabaseServices; using Autodesk.AutoCAD.EditorInput; [CommandMethod("MergeSelectionSets")] publicstaticvoidMergeSelectionSets() { // Get the current document editor Editor acDocEd = Application.DocumentManager.MdiActiveDocument.Editor;
// Request for objects to be selected in the drawing area PromptSelectionResult acSSPrompt; acSSPrompt = acDocEd.GetSelection();
SelectionSet acSSet1; ObjectIdCollection acObjIdColl = new ObjectIdCollection();
// If the prompt status is OK, objects were selected if (acSSPrompt.Status == PromptStatus.OK) { // Get the selected objects acSSet1 = acSSPrompt.Value;
// Append the selected objects to the ObjectIdCollection acObjIdColl = new ObjectIdCollection(acSSet1.GetObjectIds()); }
// Request for objects to be selected in the drawing area acSSPrompt = acDocEd.GetSelection();
SelectionSet acSSet2;
// If the prompt status is OK, objects were selected if (acSSPrompt.Status == PromptStatus.OK) { acSSet2 = acSSPrompt.Value;
// Check the size of the ObjectIdCollection, if zero, then initialize it if (acObjIdColl.Count == 0) { acObjIdColl = new ObjectIdCollection(acSSet2.GetObjectIds()); } else { // Step through the second selection set foreach (ObjectId acObjId in acSSet2.GetObjectIds()) { // Add each object id to the ObjectIdCollection acObjIdColl.Add(acObjId); } } }
Application.ShowAlertDialog("Number of objects selected: " + acObjIdColl.Count.ToString()); }
[CommandMethod("FilterSelectionSet")] publicstaticvoidFilterSelectionSet() { // Get the current document editor Editor acDocEd = Application.DocumentManager.MdiActiveDocument.Editor;
// Create a TypedValue array to define the filter criteria TypedValue[] acTypValAr = new TypedValue[1]; acTypValAr.SetValue(new TypedValue((int)DxfCode.Start, "CIRCLE"), 0);
// Assign the filter criteria to a SelectionFilter object SelectionFilter acSelFtr = new SelectionFilter(acTypValAr);
// Request for objects to be selected in the drawing area PromptSelectionResult acSSPrompt; acSSPrompt = acDocEd.GetSelection(acSelFtr);
// If the prompt status is OK, objects were selected if (acSSPrompt.Status == PromptStatus.OK) { SelectionSet acSSet = acSSPrompt.Value;
Application.ShowAlertDialog("Number of objects selected: " + acSSet.Count.ToString()); } else { Application.ShowAlertDialog("Number of objects selected: 0"); } }
[CommandMethod("FilterBlueCircleOnLayer0")] publicstaticvoidFilterBlueCircleOnLayer0() { // Get the current document editor Editor acDocEd = Application.DocumentManager.MdiActiveDocument.Editor;
// Create a TypedValue array to define the filter criteria TypedValue[] acTypValAr = new TypedValue[3]; acTypValAr.SetValue(new TypedValue((int)DxfCode.Color, 5), 0); acTypValAr.SetValue(new TypedValue((int)DxfCode.Start, "CIRCLE"), 1); acTypValAr.SetValue(new TypedValue((int)DxfCode.LayerName, "0"), 2);
// Assign the filter criteria to a SelectionFilter object SelectionFilter acSelFtr = new SelectionFilter(acTypValAr);
// Request for objects to be selected in the drawing area PromptSelectionResult acSSPrompt; acSSPrompt = acDocEd.GetSelection(acSelFtr);
// If the prompt status is OK, objects were selected if (acSSPrompt.Status == PromptStatus.OK) { SelectionSet acSSet = acSSPrompt.Value;
Application.ShowAlertDialog("Number of objects selected: " + acSSet.Count.ToString()); } else { Application.ShowAlertDialog("Number of objects selected: 0"); } }
增加过滤器列表条件的复杂性(.NET)
指定多个选择条件时,AutoCAD假定选定对象必须满足每个条件。你可以用其他方式来限定你的标准。对于数值项,可以指定关系运算(例如,圆的半径必须大于或等于5.0)。对于所有项目,您可以指定逻辑操作(例如 Text 或 MText )。
[CommandMethod("FilterRelational")] publicstaticvoidFilterRelational() { // Get the current document editor Editor acDocEd = Application.DocumentManager.MdiActiveDocument.Editor;
// Create a TypedValue array to define the filter criteria TypedValue[] acTypValAr = new TypedValue[3]; acTypValAr.SetValue(new TypedValue((int)DxfCode.Start, "CIRCLE"), 0); acTypValAr.SetValue(new TypedValue((int)DxfCode.Operator, ">="), 1); acTypValAr.SetValue(new TypedValue(40, 5), 2);
// Assign the filter criteria to a SelectionFilter object SelectionFilter acSelFtr = new SelectionFilter(acTypValAr);
// Request for objects to be selected in the drawing area PromptSelectionResult acSSPrompt; acSSPrompt = acDocEd.GetSelection(acSelFtr);
// If the prompt status is OK, objects were selected if (acSSPrompt.Status == PromptStatus.OK) { SelectionSet acSSet = acSSPrompt.Value;
Application.ShowAlertDialog("Number of objects selected: " + acSSet.Count.ToString()); } else { Application.ShowAlertDialog("Number of objects selected: 0"); } }
[CommandMethod("FilterForText")] publicstaticvoidFilterForText() { // Get the current document editor Editor acDocEd = Application.DocumentManager.MdiActiveDocument.Editor;
// Create a TypedValue array to define the filter criteria TypedValue[] acTypValAr = new TypedValue[4]; acTypValAr.SetValue(new TypedValue((int)DxfCode.Operator, "<or"), 0); acTypValAr.SetValue(new TypedValue((int)DxfCode.Start, "TEXT"), 1); acTypValAr.SetValue(new TypedValue((int)DxfCode.Start, "MTEXT"), 2); acTypValAr.SetValue(new TypedValue((int)DxfCode.Operator, "or>"), 3);
// Assign the filter criteria to a SelectionFilter object SelectionFilter acSelFtr = new SelectionFilter(acTypValAr);
// Request for objects to be selected in the drawing area PromptSelectionResult acSSPrompt; acSSPrompt = acDocEd.GetSelection(acSelFtr);
// If the prompt status is OK, objects were selected if (acSSPrompt.Status == PromptStatus.OK) { SelectionSet acSSet = acSSPrompt.Value;
Application.ShowAlertDialog("Number of objects selected: " + acSSet.Count.ToString()); } else { Application.ShowAlertDialog("Number of objects selected: 0"); } }
[CommandMethod("FilterMtextWildcard")] publicstaticvoidFilterMtextWildcard() { // Get the current document editor Editor acDocEd = Application.DocumentManager.MdiActiveDocument.Editor;
// Create a TypedValue array to define the filter criteria TypedValue[] acTypValAr = new TypedValue[2]; acTypValAr.SetValue(new TypedValue((int)DxfCode.Start, "MTEXT"), 0); acTypValAr.SetValue(new TypedValue((int)DxfCode.Text, "*The*"), 1);
// Assign the filter criteria to a SelectionFilter object SelectionFilter acSelFtr = new SelectionFilter(acTypValAr);
// Request for objects to be selected in the drawing area PromptSelectionResult acSSPrompt; acSSPrompt = acDocEd.GetSelection(acSelFtr);
// If the prompt status is OK, objects were selected if (acSSPrompt.Status == PromptStatus.OK) { SelectionSet acSSet = acSSPrompt.Value;
Application.ShowAlertDialog("Number of objects selected: " + acSSet.Count.ToString()); } else { Application.ShowAlertDialog("Number of objects selected: 0"); } }
[CommandMethod("FilterXdata")] publicstaticvoidFilterXdata() { // Get the current document editor Editor acDocEd = Application.DocumentManager.MdiActiveDocument.Editor;
// Create a TypedValue array to define the filter criteria TypedValue[] acTypValAr = new TypedValue[2]; acTypValAr.SetValue(new TypedValue((int)DxfCode.Start, "Circle"), 0); acTypValAr.SetValue(new TypedValue((int)DxfCode.ExtendedDataRegAppName, "MY_APP"), 1);
// Assign the filter criteria to a SelectionFilter object SelectionFilter acSelFtr = new SelectionFilter(acTypValAr);
// Request for objects to be selected in the drawing area PromptSelectionResult acSSPrompt; acSSPrompt = acDocEd.GetSelection(acSelFtr);
// If the prompt status is OK, objects were selected if (acSSPrompt.Status == PromptStatus.OK) { SelectionSet acSSet = acSSPrompt.Value;
Application.ShowAlertDialog("Number of objects selected: " + acSSet.Count.ToString()); } else { Application.ShowAlertDialog("Number of objects selected: 0"); } }
[CommandMethod("PurgeUnreferencedLayers")] publicstaticvoidPurgeUnreferencedLayers() { // Get the current document and database Document acDoc = Application.DocumentManager.MdiActiveDocument; Database acCurDb = acDoc.Database;
// Start a transaction using (Transaction acTrans = acCurDb.TransactionManager.StartTransaction()) { // Open the Layer table for read LayerTable acLyrTbl; acLyrTbl = acTrans.GetObject(acCurDb.LayerTableId, OpenMode.ForRead) as LayerTable;
// Create an ObjectIdCollection to hold the object ids for each table record ObjectIdCollection acObjIdColl = new ObjectIdCollection();
// Step through each layer and add iterator to the ObjectIdCollection foreach (ObjectId acObjId in acLyrTbl) { acObjIdColl.Add(acObjId); }
// Remove the layers that are in use and return the ones that can be erased acCurDb.Purge(acObjIdColl);
// Step through the returned ObjectIdCollection // and erase each unreferenced layer foreach (ObjectId acObjId in acObjIdColl) { SymbolTableRecord acSymTblRec; acSymTblRec = acTrans.GetObject(acObjId, OpenMode.ForWrite) as SymbolTableRecord;
try { // Erase the unreferenced layer acSymTblRec.Erase(true); } catch (Autodesk.AutoCAD.Runtime.Exception Ex) { // Layer could not be deleted Application.ShowAlertDialog("Error:\n" + Ex.Message); } }
// Commit the changes and dispose of the transaction acTrans.Commit(); } }
[CommandMethod("RenameLayer")] publicstaticvoidRenameLayer() { // Get the current document and database Document acDoc = Application.DocumentManager.MdiActiveDocument; Database acCurDb = acDoc.Database;
// Start a transaction using (Transaction acTrans = acCurDb.TransactionManager.StartTransaction()) { // Returns the layer table for the current database LayerTable acLyrTbl; acLyrTbl = acTrans.GetObject(acCurDb.LayerTableId, OpenMode.ForWrite) as LayerTable;
// Clone layer 0 (copy it and its properties) as a new layer LayerTableRecord acLyrTblRec; acLyrTblRec = acTrans.GetObject(acLyrTbl["0"], OpenMode.ForRead).Clone() as LayerTableRecord;
// Change the name of the cloned layer acLyrTblRec.Name = "MyLayer";
// Add the cloned layer to the Layer table and transaction acLyrTbl.Add(acLyrTblRec); acTrans.AddNewlyCreatedDBObject(acLyrTblRec, true);
// Save changes and dispose of the transaction acTrans.Commit(); } }
[CommandMethod("EraseObject")] publicstaticvoidEraseObject() { // Get the current document and database Document acDoc = Application.DocumentManager.MdiActiveDocument; Database acCurDb = acDoc.Database;
// Start a transaction using (Transaction acTrans = acCurDb.TransactionManager.StartTransaction()) { // Open the Block table for read BlockTable acBlkTbl; acBlkTbl = acTrans.GetObject(acCurDb.BlockTableId, OpenMode.ForRead) as BlockTable;
// Open the Block table record Model space for write BlockTableRecord acBlkTblRec; acBlkTblRec = acTrans.GetObject(acBlkTbl[BlockTableRecord.ModelSpace], OpenMode.ForWrite) as BlockTableRecord;
// Create a lightweight polyline using (Polyline acPoly = new Polyline()) { acPoly.AddVertexAt(0, new Point2d(2, 4), 0, 0, 0); acPoly.AddVertexAt(1, new Point2d(4, 2), 0, 0, 0); acPoly.AddVertexAt(2, new Point2d(6, 4), 0, 0, 0);
// Add the new object to the block table record and the transaction acBlkTblRec.AppendEntity(acPoly); acTrans.AddNewlyCreatedDBObject(acPoly, true);
// Update the display and display an alert message acDoc.Editor.Regen(); Application.ShowAlertDialog("Erase the newly added polyline.");
// Erase the polyline from the drawing acPoly.Erase(true); }
// Save the new object to the database acTrans.Commit(); } }
[CommandMethod("SingleCopy")] publicstaticvoidSingleCopy() { // Get the current document and database Document acDoc = Application.DocumentManager.MdiActiveDocument; Database acCurDb = acDoc.Database;
// Start a transaction using (Transaction acTrans = acCurDb.TransactionManager.StartTransaction()) { // Open the Block table for read BlockTable acBlkTbl; acBlkTbl = acTrans.GetObject(acCurDb.BlockTableId, OpenMode.ForRead) as BlockTable;
// Open the Block table record Model space for write BlockTableRecord acBlkTblRec; acBlkTblRec = acTrans.GetObject(acBlkTbl[BlockTableRecord.ModelSpace], OpenMode.ForWrite) as BlockTableRecord;
// Create a circle that is at 2,3 with a radius of 4.25 using (Circle acCirc = new Circle()) { acCirc.Center = new Point3d(2, 3, 0); acCirc.Radius = 4.25;
// Add the new object to the block table record and the transaction acBlkTblRec.AppendEntity(acCirc); acTrans.AddNewlyCreatedDBObject(acCirc, true);
// Create a copy of the circle and change its radius Circle acCircClone = acCirc.Clone() as Circle; acCircClone.Radius = 1;
// Add the cloned circle acBlkTblRec.AppendEntity(acCircClone); acTrans.AddNewlyCreatedDBObject(acCircClone, true); }
// Save the new object to the database acTrans.Commit(); } }
[CommandMethod("MultipleCopy")] publicstaticvoidMultipleCopy() { // Get the current document and database Document acDoc = Application.DocumentManager.MdiActiveDocument; Database acCurDb = acDoc.Database;
// Start a transaction using (Transaction acTrans = acCurDb.TransactionManager.StartTransaction()) { // Open the Block table for read BlockTable acBlkTbl; acBlkTbl = acTrans.GetObject(acCurDb.BlockTableId, OpenMode.ForRead) as BlockTable;
// Open the Block table record Model space for write BlockTableRecord acBlkTblRec; acBlkTblRec = acTrans.GetObject(acBlkTbl[BlockTableRecord.ModelSpace], OpenMode.ForWrite) as BlockTableRecord;
// Create a circle that is at (0,0,0) with a radius of 5 using (Circle acCirc1 = new Circle()) { acCirc1.Center = new Point3d(0, 0, 0); acCirc1.Radius = 5;
// Add the new object to the block table record and the transaction acBlkTblRec.AppendEntity(acCirc1); acTrans.AddNewlyCreatedDBObject(acCirc1, true);
// Create a circle that is at (0,0,0) with a radius of 7 using (Circle acCirc2 = new Circle()) { acCirc2.Center = new Point3d(0, 0, 0); acCirc2.Radius = 7;
// Add the new object to the block table record and the transaction acBlkTblRec.AppendEntity(acCirc2); acTrans.AddNewlyCreatedDBObject(acCirc2, true);
// Add all the objects to clone DBObjectCollection acDBObjColl = new DBObjectCollection(); acDBObjColl.Add(acCirc1); acDBObjColl.Add(acCirc2);
foreach (Entity acEnt in acDBObjColl) { Entity acEntClone; acEntClone = acEnt.Clone() as Entity; acEntClone.ColorIndex = 1;
// Create a matrix and move each copied entity 15 units acEntClone.TransformBy(Matrix3d.Displacement(new Vector3d(15, 0, 0)));
[CommandMethod("CopyObjectsBetweenDatabases", CommandFlags.Session)] publicstaticvoidCopyObjectsBetweenDatabases() { ObjectIdCollection acObjIdColl = new ObjectIdCollection();
// Get the current document and database Document acDoc = Application.DocumentManager.MdiActiveDocument; Database acCurDb = acDoc.Database;
// Lock the current document using (DocumentLock acLckDocCur = acDoc.LockDocument()) { // Start a transaction using (Transaction acTrans = acCurDb.TransactionManager.StartTransaction()) { // Open the Block table record for read BlockTable acBlkTbl; acBlkTbl = acTrans.GetObject(acCurDb.BlockTableId, OpenMode.ForRead) as BlockTable;
// Open the Block table record Model space for write BlockTableRecord acBlkTblRec; acBlkTblRec = acTrans.GetObject(acBlkTbl[BlockTableRecord.ModelSpace], OpenMode.ForWrite) as BlockTableRecord;
// Create a circle that is at (0,0,0) with a radius of 5 using (Circle acCirc1 = new Circle()) { acCirc1.Center = new Point3d(0, 0, 0); acCirc1.Radius = 5;
// Add the new object to the block table record and the transaction acBlkTblRec.AppendEntity(acCirc1); acTrans.AddNewlyCreatedDBObject(acCirc1, true);
// Create a circle that is at (0,0,0) with a radius of 7 using (Circle acCirc2 = new Circle()) { acCirc2.Center = new Point3d(0, 0, 0); acCirc2.Radius = 7;
// Add the new object to the block table record and the transaction acBlkTblRec.AppendEntity(acCirc2); acTrans.AddNewlyCreatedDBObject(acCirc2, true);
// Add all the objects to copy to the new document acObjIdColl = new ObjectIdCollection(); acObjIdColl.Add(acCirc1.ObjectId); acObjIdColl.Add(acCirc2.ObjectId); } }
// Save the new objects to the database acTrans.Commit(); }
// Unlock the document }
// Change the file and path to match a drawing template on your workstation string sLocalRoot = Application.GetSystemVariable("LOCALROOTPREFIX") asstring; string sTemplatePath = sLocalRoot + "Template\\acad.dwt";
// Create a new drawing to copy the objects to DocumentCollection acDocMgr = Application.DocumentManager; Document acNewDoc = acDocMgr.Add(sTemplatePath); Database acDbNewDoc = acNewDoc.Database;
// Lock the new document using (DocumentLock acLckDoc = acNewDoc.LockDocument()) { // Start a transaction in the new database using (Transaction acTrans = acDbNewDoc.TransactionManager.StartTransaction()) { // Open the Block table for read BlockTable acBlkTblNewDoc; acBlkTblNewDoc = acTrans.GetObject(acDbNewDoc.BlockTableId, OpenMode.ForRead) as BlockTable;
// Open the Block table record Model space for read BlockTableRecord acBlkTblRecNewDoc; acBlkTblRecNewDoc = acTrans.GetObject(acBlkTblNewDoc[BlockTableRecord.ModelSpace], OpenMode.ForRead) as BlockTableRecord;
// Clone the objects to the new database IdMapping acIdMap = new IdMapping(); acCurDb.WblockCloneObjects(acObjIdColl, acBlkTblRecNewDoc.ObjectId, acIdMap, DuplicateRecordCloning.Ignore, false);
// Save the copied objects to the database acTrans.Commit(); }
// Unlock the document }
// Set the new document current acDocMgr.MdiActiveDocument = acNewDoc; }
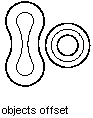
[CommandMethod("OffsetObject")] publicstaticvoidOffsetObject() { // Get the current document and database Document acDoc = Application.DocumentManager.MdiActiveDocument; Database acCurDb = acDoc.Database;
// Start a transaction using (Transaction acTrans = acCurDb.TransactionManager.StartTransaction()) { // Open the Block table for read BlockTable acBlkTbl; acBlkTbl = acTrans.GetObject(acCurDb.BlockTableId, OpenMode.ForRead) as BlockTable;
// Open the Block table record Model space for write BlockTableRecord acBlkTblRec; acBlkTblRec = acTrans.GetObject(acBlkTbl[BlockTableRecord.ModelSpace], OpenMode.ForWrite) as BlockTableRecord;
// Create a lightweight polyline using (Polyline acPoly = new Polyline()) { acPoly.AddVertexAt(0, new Point2d(1, 1), 0, 0, 0); acPoly.AddVertexAt(1, new Point2d(1, 2), 0, 0, 0); acPoly.AddVertexAt(2, new Point2d(2, 2), 0, 0, 0); acPoly.AddVertexAt(3, new Point2d(3, 2), 0, 0, 0); acPoly.AddVertexAt(4, new Point2d(4, 4), 0, 0, 0); acPoly.AddVertexAt(5, new Point2d(4, 1), 0, 0, 0);
// Add the new object to the block table record and the transaction acBlkTblRec.AppendEntity(acPoly); acTrans.AddNewlyCreatedDBObject(acPoly, true);
// Offset the polyline a given distance DBObjectCollection acDbObjColl = acPoly.GetOffsetCurves(0.25);
// Step through the new objects created foreach (Entity acEnt in acDbObjColl) { // Add each offset object acBlkTblRec.AppendEntity(acEnt); acTrans.AddNewlyCreatedDBObject(acEnt, true); } }
// Save the new objects to the database acTrans.Commit(); } }
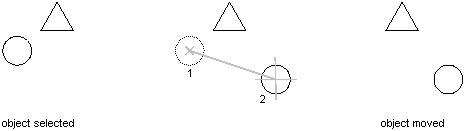
[CommandMethod("MoveObject")] publicstaticvoidMoveObject() { // Get the current document and database Document acDoc = Application.DocumentManager.MdiActiveDocument; Database acCurDb = acDoc.Database;
// Start a transaction using (Transaction acTrans = acCurDb.TransactionManager.StartTransaction()) { // Open the Block table for read BlockTable acBlkTbl; acBlkTbl = acTrans.GetObject(acCurDb.BlockTableId, OpenMode.ForRead) as BlockTable;
// Open the Block table record Model space for write BlockTableRecord acBlkTblRec; acBlkTblRec = acTrans.GetObject(acBlkTbl[BlockTableRecord.ModelSpace], OpenMode.ForWrite) as BlockTableRecord;
// Create a circle that is at 2,2 with a radius of 0.5 using (Circle acCirc = new Circle()) { acCirc.Center = new Point3d(2, 2, 0); acCirc.Radius = 0.5;
// Create a matrix and move the circle using a vector from (0,0,0) to (2,0,0) Point3d acPt3d = new Point3d(0, 0, 0); Vector3d acVec3d = acPt3d.GetVectorTo(new Point3d(2, 0, 0));
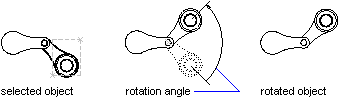
[CommandMethod("RotateObject")] publicstaticvoidRotateObject() { // Get the current document and database Document acDoc = Application.DocumentManager.MdiActiveDocument; Database acCurDb = acDoc.Database;
// Start a transaction using (Transaction acTrans = acCurDb.TransactionManager.StartTransaction()) { // Open the Block table for read BlockTable acBlkTbl; acBlkTbl = acTrans.GetObject(acCurDb.BlockTableId, OpenMode.ForRead) as BlockTable;
// Open the Block table record Model space for write BlockTableRecord acBlkTblRec; acBlkTblRec = acTrans.GetObject(acBlkTbl[BlockTableRecord.ModelSpace], OpenMode.ForWrite) as BlockTableRecord;
// Create a lightweight polyline using (Polyline acPoly = new Polyline()) { acPoly.AddVertexAt(0, new Point2d(1, 2), 0, 0, 0); acPoly.AddVertexAt(1, new Point2d(1, 3), 0, 0, 0); acPoly.AddVertexAt(2, new Point2d(2, 3), 0, 0, 0); acPoly.AddVertexAt(3, new Point2d(3, 3), 0, 0, 0); acPoly.AddVertexAt(4, new Point2d(4, 4), 0, 0, 0); acPoly.AddVertexAt(5, new Point2d(4, 2), 0, 0, 0);
// Rotate the polyline 45 degrees, around the Z-axis of the current UCS // using a base point of (4,4.25,0) acPoly.TransformBy(Matrix3d.Rotation(0.7854, curUCS.Zaxis, new Point3d(4, 4.25, 0)));
// Add the new object to the block table record and the transaction acBlkTblRec.AppendEntity(acPoly); acTrans.AddNewlyCreatedDBObject(acPoly, true); }
// Save the new objects to the database acTrans.Commit(); } }
若要管理 Text 对象的反射特性,请使用MIRTEXT系统变量。MIRRTEXT的默认设置为On(1),这会导致 Text 对象像任何其他对象一样被镜像。当MIRRTEXT为Off(0)时,不镜像文本。使用 GetSystemVariable 和 SetSystemVariable 方法查询并设置MIRRText设置。
[CommandMethod("MirrorObject")] publicstaticvoidMirrorObject() { // Get the current document and database Document acDoc = Application.DocumentManager.MdiActiveDocument; Database acCurDb = acDoc.Database;
// Start a transaction using (Transaction acTrans = acCurDb.TransactionManager.StartTransaction()) { // Open the Block table for read BlockTable acBlkTbl; acBlkTbl = acTrans.GetObject(acCurDb.BlockTableId, OpenMode.ForRead) as BlockTable;
// Open the Block table record Model space for write BlockTableRecord acBlkTblRec; acBlkTblRec = acTrans.GetObject(acBlkTbl[BlockTableRecord.ModelSpace], OpenMode.ForWrite) as BlockTableRecord;
// Create a lightweight polyline using (Polyline acPoly = new Polyline()) { acPoly.AddVertexAt(0, new Point2d(1, 1), 0, 0, 0); acPoly.AddVertexAt(1, new Point2d(1, 2), 0, 0, 0); acPoly.AddVertexAt(2, new Point2d(2, 2), 0, 0, 0); acPoly.AddVertexAt(3, new Point2d(3, 2), 0, 0, 0); acPoly.AddVertexAt(4, new Point2d(4, 4), 0, 0, 0); acPoly.AddVertexAt(5, new Point2d(4, 1), 0, 0, 0);
// Create a bulge of -2 at vertex 1 acPoly.SetBulgeAt(1, -2);
// Close the polyline acPoly.Closed = true;
// Add the new object to the block table record and the transaction acBlkTblRec.AppendEntity(acPoly); acTrans.AddNewlyCreatedDBObject(acPoly, true);
// Create a copy of the original polyline Polyline acPolyMirCopy = acPoly.Clone() as Polyline; acPolyMirCopy.ColorIndex = 5;
// Define the mirror line Point3d acPtFrom = new Point3d(0, 4.25, 0); Point3d acPtTo = new Point3d(4, 4.25, 0); Line3d acLine3d = new Line3d(acPtFrom, acPtTo);
// Mirror the polyline across the X axis acPolyMirCopy.TransformBy(Matrix3d.Mirroring(acLine3d));
// Add the new object to the block table record and the transaction acBlkTblRec.AppendEntity(acPolyMirCopy); acTrans.AddNewlyCreatedDBObject(acPolyMirCopy, true); }
// Save the new objects to the database acTrans.Commit(); } }
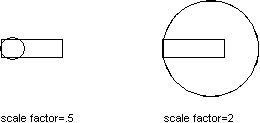
[CommandMethod("ScaleObject")] publicstaticvoidScaleObject() { // Get the current document and database Document acDoc = Application.DocumentManager.MdiActiveDocument; Database acCurDb = acDoc.Database;
// Start a transaction using (Transaction acTrans = acCurDb.TransactionManager.StartTransaction()) { // Open the Block table for read BlockTable acBlkTbl; acBlkTbl = acTrans.GetObject(acCurDb.BlockTableId, OpenMode.ForRead) as BlockTable;
// Open the Block table record Model space for write BlockTableRecord acBlkTblRec; acBlkTblRec = acTrans.GetObject(acBlkTbl[BlockTableRecord.ModelSpace], OpenMode.ForWrite) as BlockTableRecord;
// Create a lightweight polyline using (Polyline acPoly = new Polyline()) { acPoly.AddVertexAt(0, new Point2d(1, 2), 0, 0, 0); acPoly.AddVertexAt(1, new Point2d(1, 3), 0, 0, 0); acPoly.AddVertexAt(2, new Point2d(2, 3), 0, 0, 0); acPoly.AddVertexAt(3, new Point2d(3, 3), 0, 0, 0); acPoly.AddVertexAt(4, new Point2d(4, 4), 0, 0, 0); acPoly.AddVertexAt(5, new Point2d(4, 2), 0, 0, 0);
// Close the polyline acPoly.Closed = true;
// Reduce the object by a factor of 0.5 // using a base point of (4,4.25,0) acPoly.TransformBy(Matrix3d.Scaling(0.5, new Point3d(4, 4.25, 0)));
// Add the new object to the block table record and the transaction acBlkTblRec.AppendEntity(acPoly); acTrans.AddNewlyCreatedDBObject(acPoly, true); }
// Save the new objects to the database acTrans.Commit(); } }
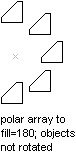
static Point2d PolarPoints(Point2d pPt, double dAng, double dDist) { returnnew Point2d(pPt.X + dDist * Math.Cos(dAng), pPt.Y + dDist * Math.Sin(dAng)); } [CommandMethod("PolarArrayObject")] publicstaticvoidPolarArrayObject() { // Get the current document and database Document acDoc = Application.DocumentManager.MdiActiveDocument; Database acCurDb = acDoc.Database;
// Start a transaction using (Transaction acTrans = acCurDb.TransactionManager.StartTransaction()) { // Open the Block table record for read BlockTable acBlkTbl; acBlkTbl = acTrans.GetObject(acCurDb.BlockTableId, OpenMode.ForRead) as BlockTable;
// Open the Block table record Model space for write BlockTableRecord acBlkTblRec; acBlkTblRec = acTrans.GetObject(acBlkTbl[BlockTableRecord.ModelSpace], OpenMode.ForWrite) as BlockTableRecord;
// Create a circle that is at 2,2 with a radius of 1 using (Circle acCirc = new Circle()) { acCirc.Center = new Point3d(2, 2, 0); acCirc.Radius = 1;
// Add the new object to the block table record and the transaction acBlkTblRec.AppendEntity(acCirc); acTrans.AddNewlyCreatedDBObject(acCirc, true);
// Create a 4 object polar array that goes a 180 int nCount = 1;
// Set a value in radians for 60 degrees double dAng = 1.0472;
// Use (4,4,0) as the base point for the array Point2d acPt2dArrayBase = new Point2d(4, 4);
while (nCount < 4) { Entity acEntClone = acCirc.Clone() as Entity;
Extents3d acExts; Point2d acPtObjBase;
// Typically the upper-left corner of an object's extents is used // for the point on the object to be arrayed unless it is // an object like a circle. Circle acCircArrObj = acEntClone as Circle;
if (acCircArrObj != null) { acPtObjBase = new Point2d(acCircArrObj.Center.X, acCircArrObj.Center.Y); } else { acExts = acEntClone.Bounds.GetValueOrDefault(); acPtObjBase = new Point2d(acExts.MinPoint.X, acExts.MaxPoint.Y); }
/* // The following code demonstrates how to rotate each object like // the ARRAY command does. acExts = acEntClone.Bounds.GetValueOrDefault(); acPtObjBase = new Point2d(acExts.MinPoint.X, acExts.MaxPoint.Y); // Rotate the cloned entity around its upper-left extents point Matrix3d curUCSMatrix = acDoc.Editor.CurrentUserCoordinateSystem; CoordinateSystem3d curUCS = curUCSMatrix.CoordinateSystem3d; acEntClone.TransformBy(Matrix3d.Rotation(nCount * dAng, curUCS.Zaxis, new Point3d(acPtObjBase.X, acPtObjBase.Y, 0))); */
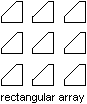
static Point2d PolarPoints(Point2d pPt, double dAng, double dDist) { returnnew Point2d(pPt.X + dDist * Math.Cos(dAng), pPt.Y + dDist * Math.Sin(dAng)); } [CommandMethod("RectangularArrayObject")] publicstaticvoidRectangularArrayObject() { // Get the current document and database Document acDoc = Application.DocumentManager.MdiActiveDocument; Database acCurDb = acDoc.Database;
// Start a transaction using (Transaction acTrans = acCurDb.TransactionManager.StartTransaction()) { // Open the Block table record for read BlockTable acBlkTbl; acBlkTbl = acTrans.GetObject(acCurDb.BlockTableId, OpenMode.ForRead) as BlockTable;
// Open the Block table record Model space for write BlockTableRecord acBlkTblRec; acBlkTblRec = acTrans.GetObject(acBlkTbl[BlockTableRecord.ModelSpace], OpenMode.ForWrite) as BlockTableRecord;
// Create a circle that is at 2,2 with a radius of 0.5 using (Circle acCirc = new Circle()) { acCirc.Center = new Point3d(2, 2, 0); acCirc.Radius = 0.5;
// Add the new object to the block table record and the transaction acBlkTblRec.AppendEntity(acCirc); acTrans.AddNewlyCreatedDBObject(acCirc, true);
// Create a rectangular array with 5 rows and 5 columns int nRows = 5; int nColumns = 5;
// Set the row and column offsets along with the base array angle double dRowOffset = 1; double dColumnOffset = 1; double dArrayAng = 0;
// Get the angle from X for the current UCS Matrix3d curUCSMatrix = acDoc.Editor.CurrentUserCoordinateSystem; CoordinateSystem3d curUCS = curUCSMatrix.CoordinateSystem3d; Vector2d acVec2dAng = new Vector2d(curUCS.Xaxis.X, curUCS.Xaxis.Y);
// If the UCS is rotated, adjust the array angle accordingly dArrayAng = dArrayAng + acVec2dAng.Angle;
// Use the upper-left corner of the objects extents for the array base point Extents3d acExts = acCirc.Bounds.GetValueOrDefault(); Point2d acPt2dArrayBase = new Point2d(acExts.MinPoint.X, acExts.MaxPoint.Y);
// Track the objects created for each column DBObjectCollection acDBObjCollCols = new DBObjectCollection(); acDBObjCollCols.Add(acCirc);
// Create the number of objects for the first column int nColumnsCount = 1; while (nColumns > nColumnsCount) { Entity acEntClone = acCirc.Clone() as Entity; acDBObjCollCols.Add(acEntClone);
// Caclucate the new point for the copied object (move) Point2d acPt2dTo = PolarPoints(acPt2dArrayBase, dArrayAng, dColumnOffset * nColumnsCount);
[CommandMethod("ExtendObject")] publicstaticvoidExtendObject() { // Get the current document and database Document acDoc = Application.DocumentManager.MdiActiveDocument; Database acCurDb = acDoc.Database;
// Start a transaction using (Transaction acTrans = acCurDb.TransactionManager.StartTransaction()) { // Open the Block table for read BlockTable acBlkTbl; acBlkTbl = acTrans.GetObject(acCurDb.BlockTableId, OpenMode.ForRead) as BlockTable;
// Open the Block table record Model space for write BlockTableRecord acBlkTblRec; acBlkTblRec = acTrans.GetObject(acBlkTbl[BlockTableRecord.ModelSpace], OpenMode.ForWrite) as BlockTableRecord;
// Create a line that starts at (4,4,0) and ends at (7,7,0) using (Line acLine = new Line(new Point3d(4, 4, 0), new Point3d(7, 7, 0))) {
// Add the new object to the block table record and the transaction acBlkTblRec.AppendEntity(acLine); acTrans.AddNewlyCreatedDBObject(acLine, true);
// Update the display and diaplay a message box acDoc.Editor.Regen(); Application.ShowAlertDialog("Before extend");
// Double the length of the line acLine.EndPoint = acLine.EndPoint + acLine.Delta; }
// Save the new object to the database acTrans.Commit(); } }
[CommandMethod("ExplodeObject")] publicstaticvoidExplodeObject() { // Get the current document and database Document acDoc = Application.DocumentManager.MdiActiveDocument; Database acCurDb = acDoc.Database;
// Start a transaction using (Transaction acTrans = acCurDb.TransactionManager.StartTransaction()) { // Open the Block table for read BlockTable acBlkTbl; acBlkTbl = acTrans.GetObject(acCurDb.BlockTableId, OpenMode.ForRead) as BlockTable;
// Open the Block table record Model space for write BlockTableRecord acBlkTblRec; acBlkTblRec = acTrans.GetObject(acBlkTbl[BlockTableRecord.ModelSpace], OpenMode.ForWrite) as BlockTableRecord;
// Create a lightweight polyline using (Polyline acPoly = new Polyline()) { acPoly.AddVertexAt(0, new Point2d(1, 1), 0, 0, 0); acPoly.AddVertexAt(1, new Point2d(1, 2), 0, 0, 0); acPoly.AddVertexAt(2, new Point2d(2, 2), 0, 0, 0); acPoly.AddVertexAt(3, new Point2d(3, 2), 0, 0, 0); acPoly.AddVertexAt(4, new Point2d(4, 4), 0, 0, 0); acPoly.AddVertexAt(5, new Point2d(4, 1), 0, 0, 0);
// Sets the bulge at index 3 acPoly.SetBulgeAt(3, -0.5);
// Explodes the polyline DBObjectCollection acDBObjColl = new DBObjectCollection(); acPoly.Explode(acDBObjColl);
foreach (Entity acEnt in acDBObjColl) { // Add the new object to the block table record and the transaction acBlkTblRec.AppendEntity(acEnt); acTrans.AddNewlyCreatedDBObject(acEnt, true); }
// Dispose of the in memory polyline }
// Save the new objects to the database acTrans.Commit(); } }
[CommandMethod("EditPolyline")] publicstaticvoidEditPolyline() { // Get the current document and database Document acDoc = Application.DocumentManager.MdiActiveDocument; Database acCurDb = acDoc.Database;
// Start a transaction using (Transaction acTrans = acCurDb.TransactionManager.StartTransaction()) { // Open the Block table for read BlockTable acBlkTbl; acBlkTbl = acTrans.GetObject(acCurDb.BlockTableId, OpenMode.ForRead) as BlockTable;
// Open the Block table record Model space for write BlockTableRecord acBlkTblRec; acBlkTblRec = acTrans.GetObject(acBlkTbl[BlockTableRecord.ModelSpace], OpenMode.ForWrite) as BlockTableRecord;
// Create a lightweight polyline using (Polyline acPoly = new Polyline()) { acPoly.AddVertexAt(0, new Point2d(1, 1), 0, 0, 0); acPoly.AddVertexAt(1, new Point2d(1, 2), 0, 0, 0); acPoly.AddVertexAt(2, new Point2d(2, 2), 0, 0, 0); acPoly.AddVertexAt(3, new Point2d(3, 2), 0, 0, 0); acPoly.AddVertexAt(4, new Point2d(4, 4), 0, 0, 0);
// Add the new object to the block table record and the transaction acBlkTblRec.AppendEntity(acPoly); acTrans.AddNewlyCreatedDBObject(acPoly, true);
// Sets the bulge at index 3 acPoly.SetBulgeAt(3, -0.5);
// Add a new vertex acPoly.AddVertexAt(5, new Point2d(4, 1), 0, 0, 0);
// Sets the start and end width at index 4 acPoly.SetStartWidthAt(4, 0.1); acPoly.SetEndWidthAt(4, 0.5);
// Close the polyline acPoly.Closed = true; }
// Save the new objects to the database acTrans.Commit(); } }
[CommandMethod("EditSpline")] publicstaticvoidEditSpline() { // Get the current document and database Document acDoc = Application.DocumentManager.MdiActiveDocument; Database acCurDb = acDoc.Database;
// Start a transaction using (Transaction acTrans = acCurDb.TransactionManager.StartTransaction()) { // Open the Block table for read BlockTable acBlkTbl; acBlkTbl = acTrans.GetObject(acCurDb.BlockTableId, OpenMode.ForRead) as BlockTable;
// Open the Block table record Model space for write BlockTableRecord acBlkTblRec; acBlkTblRec = acTrans.GetObject(acBlkTbl[BlockTableRecord.ModelSpace], OpenMode.ForWrite) as BlockTableRecord; // Create a Point3d Collection Point3dCollection acPt3dColl = new Point3dCollection(); acPt3dColl.Add(new Point3d(1, 1, 0)); acPt3dColl.Add(new Point3d(5, 5, 0)); acPt3dColl.Add(new Point3d(10, 0, 0));
// Set the start and end tangency Vector3d acStartTan = new Vector3d(0.5, 0.5, 0); Vector3d acEndTan = new Vector3d(0.5, 0.5, 0);
// Create a spline using (Spline acSpline = new Spline(acPt3dColl, acStartTan, acEndTan, 4, 0)) {
// Set a control point acSpline.SetControlPointAt(0, new Point3d(0, 3, 0));
// Add the new object to the block table record and the transaction acBlkTblRec.AppendEntity(acSpline); acTrans.AddNewlyCreatedDBObject(acSpline, true); }
// Save the new objects to the database acTrans.Commit(); } }
[CommandMethod("EditHatchAppendLoop")] publicstaticvoidEditHatchAppendLoop() { // Get the current document and database Document acDoc = Application.DocumentManager.MdiActiveDocument; Database acCurDb = acDoc.Database;
// Start a transaction using (Transaction acTrans = acCurDb.TransactionManager.StartTransaction()) { // Open the Block table for read BlockTable acBlkTbl; acBlkTbl = acTrans.GetObject(acCurDb.BlockTableId, OpenMode.ForRead) as BlockTable;
// Open the Block table record Model space for write BlockTableRecord acBlkTblRec; acBlkTblRec = acTrans.GetObject(acBlkTbl[BlockTableRecord.ModelSpace], OpenMode.ForWrite) as BlockTableRecord;
// Create an arc object for the closed boundary to hatch using (Arc acArc = new Arc(new Point3d(5, 3, 0), 3, 0, 3.141592)) {
// Create an line object for the closed boundary to hatch using (Line acLine = new Line(acArc.StartPoint, acArc.EndPoint)) { acBlkTblRec.AppendEntity(acLine); acTrans.AddNewlyCreatedDBObject(acLine, true);
// Adds the arc and line to an object id collection ObjectIdCollection acObjIdColl = new ObjectIdCollection(); acObjIdColl.Add(acArc.ObjectId); acObjIdColl.Add(acLine.ObjectId);
// Create the hatch object and append it to the block table record using (Hatch acHatch = new Hatch()) { acBlkTblRec.AppendEntity(acHatch); acTrans.AddNewlyCreatedDBObject(acHatch, true);
// Set the properties of the hatch object // Associative must be set after the hatch object is appended to the // block table record and before AppendLoop acHatch.SetHatchPattern(HatchPatternType.PreDefined, "ANSI31"); acHatch.Associative = true; acHatch.AppendLoop(HatchLoopTypes.Outermost, acObjIdColl);
// Create a circle object for the inner boundary of the hatch using (Circle acCirc = new Circle()) { acCirc.Center = new Point3d(5, 4.5, 0); acCirc.Radius = 1;
// Adds the circle to an object id collection acObjIdColl.Clear(); acObjIdColl.Add(acCirc.ObjectId);
// Append the circle as the inner loop of the hatch and evaluate it acHatch.AppendLoop(HatchLoopTypes.Default, acObjIdColl); acHatch.EvaluateHatch(true); } } } }
// Save the new object to the database acTrans.Commit(); } }
[CommandMethod("EditHatchPatternScale")] publicstaticvoidEditHatchPatternScale() { // Get the current document and database Document acDoc = Application.DocumentManager.MdiActiveDocument; Database acCurDb = acDoc.Database;
// Start a transaction using (Transaction acTrans = acCurDb.TransactionManager.StartTransaction()) { // Open the Block table for read BlockTable acBlkTbl; acBlkTbl = acTrans.GetObject(acCurDb.BlockTableId, OpenMode.ForRead) as BlockTable;
// Open the Block table record Model space for write BlockTableRecord acBlkTblRec; acBlkTblRec = acTrans.GetObject(acBlkTbl[BlockTableRecord.ModelSpace], OpenMode.ForWrite) as BlockTableRecord;
// Create a circle object for the boundary of the hatch using (Circle acCirc = new Circle()) { acCirc.Center = new Point3d(5, 3, 0); acCirc.Radius = 3;
// Adds the arc and line to an object id collection ObjectIdCollection acObjIdColl = new ObjectIdCollection(); acObjIdColl.Add(acCirc.ObjectId);
// Create the hatch object and append it to the block table record using (Hatch acHatch = new Hatch()) { acBlkTblRec.AppendEntity(acHatch); acTrans.AddNewlyCreatedDBObject(acHatch, true);
// Set the properties of the hatch object // Associative must be set after the hatch object is appended to the // block table record and before AppendLoop acHatch.SetHatchPattern(HatchPatternType.PreDefined, "ANSI31"); acHatch.Associative = true; acHatch.AppendLoop(HatchLoopTypes.Outermost, acObjIdColl);
// Evaluate the hatch acHatch.EvaluateHatch(true);
// Increase the pattern scale by 2 and re-evaluate the hatch acHatch.PatternScale = acHatch.PatternScale + 2; acHatch.SetHatchPattern(acHatch.PatternType, acHatch.PatternName); acHatch.EvaluateHatch(true); } }
// Save the new object to the database acTrans.Commit(); } }
[CommandMethod("DisplayLayerNames")] publicstaticvoidDisplayLayerNames() { // Get the current document and database Document acDoc = Application.DocumentManager.MdiActiveDocument; Database acCurDb = acDoc.Database;
// Start a transaction using (Transaction acTrans = acCurDb.TransactionManager.StartTransaction()) { // Open the Layer table for read LayerTable acLyrTbl; acLyrTbl = acTrans.GetObject(acCurDb.LayerTableId, OpenMode.ForRead) as LayerTable;
string sLayerNames = "";
foreach (ObjectId acObjId in acLyrTbl) { LayerTableRecord acLyrTblRec; acLyrTblRec = acTrans.GetObject(acObjId, OpenMode.ForRead) as LayerTableRecord;
[CommandMethod("CreateAndAssignALayer")] publicstaticvoidCreateAndAssignALayer() { // Get the current document and database Document acDoc = Application.DocumentManager.MdiActiveDocument; Database acCurDb = acDoc.Database;
// Start a transaction using (Transaction acTrans = acCurDb.TransactionManager.StartTransaction()) { // Open the Layer table for read LayerTable acLyrTbl; acLyrTbl = acTrans.GetObject(acCurDb.LayerTableId, OpenMode.ForRead) as LayerTable;
string sLayerName = "Center";
if (acLyrTbl.Has(sLayerName) == false) { using (LayerTableRecord acLyrTblRec = new LayerTableRecord()) { // Assign the layer the ACI color 3 and a name acLyrTblRec.Color = Color.FromColorIndex(ColorMethod.ByAci, 3); acLyrTblRec.Name = sLayerName;
// Upgrade the Layer table for write acTrans.GetObject(acCurDb.LayerTableId, OpenMode.ForWrite);
// Append the new layer to the Layer table and the transaction acLyrTbl.Add(acLyrTblRec); acTrans.AddNewlyCreatedDBObject(acLyrTblRec, true); } }
// Open the Block table for read BlockTable acBlkTbl; acBlkTbl = acTrans.GetObject(acCurDb.BlockTableId, OpenMode.ForRead) as BlockTable;
// Open the Block table record Model space for write BlockTableRecord acBlkTblRec; acBlkTblRec = acTrans.GetObject(acBlkTbl[BlockTableRecord.ModelSpace], OpenMode.ForWrite) as BlockTableRecord;
// Create a circle object using (Circle acCirc = new Circle()) { acCirc.Center = new Point3d(2, 2, 0); acCirc.Radius = 1; acCirc.Layer = sLayerName;
[CommandMethod("SetLayerCurrent")] publicstaticvoidSetLayerCurrent() { // Get the current document and database Document acDoc = Application.DocumentManager.MdiActiveDocument; Database acCurDb = acDoc.Database;
// Start a transaction using (Transaction acTrans = acCurDb.TransactionManager.StartTransaction()) { // Open the Layer table for read LayerTable acLyrTbl; acLyrTbl = acTrans.GetObject(acCurDb.LayerTableId, OpenMode.ForRead) as LayerTable;
string sLayerName = "Center";
if (acLyrTbl.Has(sLayerName) == true) { // Set the layer Center current acCurDb.Clayer = acLyrTbl[sLayerName];
[CommandMethod("TurnLayerOff")] publicstaticvoidTurnLayerOff() { // Get the current document and database Document acDoc = Application.DocumentManager.MdiActiveDocument; Database acCurDb = acDoc.Database;
// Start a transaction using (Transaction acTrans = acCurDb.TransactionManager.StartTransaction()) { // Open the Layer table for read LayerTable acLyrTbl; acLyrTbl = acTrans.GetObject(acCurDb.LayerTableId, OpenMode.ForRead) as LayerTable;
string sLayerName = "ABC";
if (acLyrTbl.Has(sLayerName) == false) { using (LayerTableRecord acLyrTblRec = new LayerTableRecord()) { // Assign the layer a name acLyrTblRec.Name = sLayerName;
// Turn the layer off acLyrTblRec.IsOff = true;
// Upgrade the Layer table for write acTrans.GetObject(acCurDb.LayerTableId, OpenMode.ForWrite);
// Append the new layer to the Layer table and the transaction acLyrTbl.Add(acLyrTblRec); acTrans.AddNewlyCreatedDBObject(acLyrTblRec, true); } } else { LayerTableRecord acLyrTblRec = acTrans.GetObject(acLyrTbl[sLayerName], OpenMode.ForWrite) as LayerTableRecord;
// Turn the layer off acLyrTblRec.IsOff = true; }
// Open the Block table for read BlockTable acBlkTbl; acBlkTbl = acTrans.GetObject(acCurDb.BlockTableId, OpenMode.ForRead) as BlockTable;
// Open the Block table record Model space for write BlockTableRecord acBlkTblRec; acBlkTblRec = acTrans.GetObject(acBlkTbl[BlockTableRecord.ModelSpace], OpenMode.ForWrite) as BlockTableRecord;
// Create a circle object using (Circle acCirc = new Circle()) { acCirc.Center = new Point3d(2, 2, 0); acCirc.Radius = 1; acCirc.Layer = sLayerName;
[CommandMethod("FreezeLayer")] publicstaticvoidFreezeLayer() { // Get the current document and database Document acDoc = Application.DocumentManager.MdiActiveDocument; Database acCurDb = acDoc.Database;
// Start a transaction using (Transaction acTrans = acCurDb.TransactionManager.StartTransaction()) { // Open the Layer table for read LayerTable acLyrTbl; acLyrTbl = acTrans.GetObject(acCurDb.LayerTableId, OpenMode.ForRead) as LayerTable;
string sLayerName = "ABC";
if (acLyrTbl.Has(sLayerName) == false) { using (LayerTableRecord acLyrTblRec = new LayerTableRecord()) { // Assign the layer a name acLyrTblRec.Name = sLayerName;
// Freeze the layer acLyrTblRec.IsFrozen = true;
// Upgrade the Layer table for write acTrans.GetObject(acCurDb.LayerTableId, OpenMode.ForWrite);
// Append the new layer to the Layer table and the transaction acLyrTbl.Add(acLyrTblRec); acTrans.AddNewlyCreatedDBObject(acLyrTblRec, true); } } else { LayerTableRecord acLyrTblRec = acTrans.GetObject(acLyrTbl[sLayerName], OpenMode.ForWrite) as LayerTableRecord;
// Freeze the layer acLyrTblRec.IsFrozen = true; }
// Save the changes and dispose of the transaction acTrans.Commit(); } }
[CommandMethod("LockLayer")] publicstaticvoidLockLayer() { // Get the current document and database Document acDoc = Application.DocumentManager.MdiActiveDocument; Database acCurDb = acDoc.Database;
// Start a transaction using (Transaction acTrans = acCurDb.TransactionManager.StartTransaction()) { // Open the Layer table for read LayerTable acLyrTbl; acLyrTbl = acTrans.GetObject(acCurDb.LayerTableId, OpenMode.ForRead) as LayerTable;
string sLayerName = "ABC";
if (acLyrTbl.Has(sLayerName) == false) { using (LayerTableRecord acLyrTblRec = new LayerTableRecord()) { // Assign the layer a name acLyrTblRec.Name = sLayerName;
// Lock the layer acLyrTblRec.IsLocked = true;
// Upgrade the Layer table for write acTrans.GetObject(acCurDb.LayerTableId, OpenMode.ForWrite);
// Append the new layer to the Layer table and the transaction acLyrTbl.Add(acLyrTblRec); acTrans.AddNewlyCreatedDBObject(acLyrTblRec, true); } } else { LayerTableRecord acLyrTblRec = acTrans.GetObject(acLyrTbl[sLayerName], OpenMode.ForWrite) as LayerTableRecord;
// Lock the layer acLyrTblRec.IsLocked = true; }
// Save the changes and dispose of the transaction acTrans.Commit(); } }
[CommandMethod("SetLayerColor")] publicstaticvoidSetLayerColor() { // Get the current document and database Document acDoc = Application.DocumentManager.MdiActiveDocument; Database acCurDb = acDoc.Database;
// Start a transaction using (Transaction acTrans = acCurDb.TransactionManager.StartTransaction()) { // Open the Layer table for read LayerTable acLyrTbl; acLyrTbl = acTrans.GetObject(acCurDb.LayerTableId, OpenMode.ForRead) as LayerTable;
// Define an array of layer names string[] sLayerNames = newstring[3]; sLayerNames[0] = "ACIRed"; sLayerNames[1] = "TrueBlue"; sLayerNames[2] = "ColorBookYellow";
// Define an array of colors for the layers Color[] acColors = new Color[3]; acColors[0] = Color.FromColorIndex(ColorMethod.ByAci, 1); acColors[1] = Color.FromRgb(23, 54, 232); acColors[2] = Color.FromNames("PANTONE Yellow 0131 C", "PANTONE+ Pastels & Neons Coated");
int nCnt = 0;
// Add or change each layer in the drawing foreach (string sLayerName in sLayerNames) { if (acLyrTbl.Has(sLayerName) == false) { using (LayerTableRecord acLyrTblRec = new LayerTableRecord()) { // Assign the layer a name acLyrTblRec.Name = sLayerName;
// Set the color of the layer acLyrTblRec.Color = acColors[nCnt];
// Upgrade the Layer table for write if (acLyrTbl.IsWriteEnabled == false) acTrans.GetObject(acCurDb.LayerTableId, OpenMode.ForWrite);
// Append the new layer to the Layer table and the transaction acLyrTbl.Add(acLyrTblRec); acTrans.AddNewlyCreatedDBObject(acLyrTblRec, true); } } else { // Open the layer if it already exists for write LayerTableRecord acLyrTblRec = acTrans.GetObject(acLyrTbl[sLayerName], OpenMode.ForWrite) as LayerTableRecord;
// Set the color of the layer acLyrTblRec.Color = acColors[nCnt]; }
nCnt = nCnt + 1; }
// Save the changes and dispose of the transaction acTrans.Commit(); } }
[CommandMethod("SetLayerLinetype")] publicstaticvoidSetLayerLinetype() { // Get the current document and database Document acDoc = Application.DocumentManager.MdiActiveDocument; Database acCurDb = acDoc.Database;
// Start a transaction using (Transaction acTrans = acCurDb.TransactionManager.StartTransaction()) { // Open the Layer table for read LayerTable acLyrTbl; acLyrTbl = acTrans.GetObject(acCurDb.LayerTableId, OpenMode.ForRead) as LayerTable;
string sLayerName = "ABC";
if (acLyrTbl.Has(sLayerName) == false) { using (LayerTableRecord acLyrTblRec = new LayerTableRecord()) { // Assign the layer a name acLyrTblRec.Name = sLayerName;
// Open the Layer table for read LinetypeTable acLinTbl; acLinTbl = acTrans.GetObject(acCurDb.LinetypeTableId, OpenMode.ForRead) as LinetypeTable;
if (acLinTbl.Has("Center") == true) { // Set the linetype for the layer acLyrTblRec.LinetypeObjectId = acLinTbl["Center"]; }
// Upgrade the Layer table for write acTrans.GetObject(acCurDb.LayerTableId, OpenMode.ForWrite);
// Append the new layer to the Layer table and the transaction acLyrTbl.Add(acLyrTblRec); acTrans.AddNewlyCreatedDBObject(acLyrTblRec, true); } } else { LayerTableRecord acLyrTblRec = acTrans.GetObject(acLyrTbl[sLayerName], OpenMode.ForRead) as LayerTableRecord;
// Open the Layer table for read LinetypeTable acLinTbl; acLinTbl = acTrans.GetObject(acCurDb.LinetypeTableId, OpenMode.ForRead) as LinetypeTable;
if (acLinTbl.Has("Center") == true) { // Upgrade the Layer Table Record for write acTrans.GetObject(acLyrTbl[sLayerName], OpenMode.ForWrite);
// Set the linetype for the layer acLyrTblRec.LinetypeObjectId = acLinTbl["Center"]; } }
// Save the changes and dispose of the transaction acTrans.Commit(); } }
[CommandMethod("EraseLayer")] publicstaticvoidEraseLayer() { // Get the current document and database Document acDoc = Application.DocumentManager.MdiActiveDocument; Database acCurDb = acDoc.Database;
// Start a transaction using (Transaction acTrans = acCurDb.TransactionManager.StartTransaction()) { // Open the Layer table for read LayerTable acLyrTbl; acLyrTbl = acTrans.GetObject(acCurDb.LayerTableId, OpenMode.ForRead) as LayerTable;
string sLayerName = "ABC";
if (acLyrTbl.Has(sLayerName) == true) { // Check to see if it is safe to erase layer ObjectIdCollection acObjIdColl = new ObjectIdCollection(); acObjIdColl.Add(acLyrTbl[sLayerName]); acCurDb.Purge(acObjIdColl);
if (acObjIdColl.Count > 0) { LayerTableRecord acLyrTblRec; acLyrTblRec = acTrans.GetObject(acObjIdColl[0], OpenMode.ForWrite) as LayerTableRecord;
try { // Erase the unreferenced layer acLyrTblRec.Erase(true);
// Save the changes and dispose of the transaction acTrans.Commit(); } catch (Autodesk.AutoCAD.Runtime.Exception Ex) { // Layer could not be deleted Application.ShowAlertDialog("Error:\n" + Ex.Message); } } } } }
使用颜色(.NET)
使用图形中单个对象的 Color 或 ColorIndex 特性为其指定颜色。 ColorIndex 特性接受AutoCAD颜色索引(ACI)值作为0 - 256的数值。 Color 属性用于为对象指定ACI编号、真彩色或配色系统颜色。要更改 Color 属性的值,可以使用 Colors 命名空间下的 Color 对象。
Color 对象有 SetRGB 方法,允许您根据将红色、绿色和蓝色值混合在一起从数百万种颜色组合中进行选择。 Color 对象还包含用于指定颜色名称、配色系统、颜色索引和颜色值的方法和属性。
[CommandMethod("SetObjectColor")] publicstaticvoidSetObjectColor() { // Get the current document and database Document acDoc = Application.DocumentManager.MdiActiveDocument; Database acCurDb = acDoc.Database;
// Start a transaction using (Transaction acTrans = acCurDb.TransactionManager.StartTransaction()) { // Define an array of colors for the layers Color[] acColors = new Color[3]; acColors[0] = Color.FromColorIndex(ColorMethod.ByAci, 1); acColors[1] = Color.FromRgb(23, 54, 232); acColors[2] = Color.FromNames("PANTONE Yellow 0131 C", "PANTONE(R) pastel coated");
// Open the Block table for read BlockTable acBlkTbl; acBlkTbl = acTrans.GetObject(acCurDb.BlockTableId, OpenMode.ForRead) as BlockTable;
// Open the Block table record Model space for write BlockTableRecord acBlkTblRec; acBlkTblRec = acTrans.GetObject(acBlkTbl[BlockTableRecord.ModelSpace], OpenMode.ForWrite) as BlockTableRecord;
// Create a circle object and assign it the ACI value of 4 Point3d acPt = new Point3d(0, 3, 0); using (Circle acCirc = new Circle()) { acCirc.Center = acPt; acCirc.Radius = 1; acCirc.ColorIndex = 4;
// Save the changes and dispose of the transaction acTrans.Commit(); } }
通过数据库使颜色成为当前颜色(.NET)
此示例通过具有 Cecolor 属性的 Database 对象设置当前颜色。
1 2 3 4 5 6 7 8 9
[CommandMethod("SetColorCurrent")] publicstaticvoidSetColorCurrent() { // Get the current document Document acDoc = Application.DocumentManager.MdiActiveDocument; // Set the current color acDoc.Database.Cecolor = Color.FromColorIndex(ColorMethod.ByLayer, 256); }
[CommandMethod("LoadLinetype")] publicstaticvoidLoadLinetype() { // Get the current document and database Document acDoc = Application.DocumentManager.MdiActiveDocument; Database acCurDb = acDoc.Database;
// Start a transaction using (Transaction acTrans = acCurDb.TransactionManager.StartTransaction()) { // Open the Linetype table for read LinetypeTable acLineTypTbl; acLineTypTbl = acTrans.GetObject(acCurDb.LinetypeTableId, OpenMode.ForRead) as LinetypeTable;
string sLineTypName = "Center";
if (acLineTypTbl.Has(sLineTypName) == false) { // Load the Center Linetype acCurDb.LoadLineTypeFile(sLineTypName, "acad.lin"); }
// Save the changes and dispose of the transaction acTrans.Commit(); } }
[CommandMethod("SetObjectLinetype")] publicstaticvoidSetObjectLinetype() { // Get the current document and database Document acDoc = Application.DocumentManager.MdiActiveDocument; Database acCurDb = acDoc.Database;
// Start a transaction using (Transaction acTrans = acCurDb.TransactionManager.StartTransaction()) { // Open the Linetype table for read LinetypeTable acLineTypTbl; acLineTypTbl = acTrans.GetObject(acCurDb.LinetypeTableId, OpenMode.ForRead) as LinetypeTable;
string sLineTypName = "Center";
if (acLineTypTbl.Has(sLineTypName) == false) { acCurDb.LoadLineTypeFile(sLineTypName, "acad.lin"); }
// Open the Block table for read BlockTable acBlkTbl; acBlkTbl = acTrans.GetObject(acCurDb.BlockTableId, OpenMode.ForRead) as BlockTable;
// Open the Block table record Model space for write BlockTableRecord acBlkTblRec; acBlkTblRec = acTrans.GetObject(acBlkTbl[BlockTableRecord.ModelSpace], OpenMode.ForWrite) as BlockTableRecord;
// Create a circle object using (Circle acCirc = new Circle()) { acCirc.Center = new Point3d(2, 2, 0); acCirc.Radius = 1; acCirc.Linetype = sLineTypName;
[CommandMethod("SetLinetypeCurrent")] publicstaticvoidSetLinetypeCurrent() { // Get the current document and database Document acDoc = Application.DocumentManager.MdiActiveDocument; Database acCurDb = acDoc.Database;
// Start a transaction using (Transaction acTrans = acCurDb.TransactionManager.StartTransaction()) { // Open the Linetype table for read LinetypeTable acLineTypTbl; acLineTypTbl = acTrans.GetObject(acCurDb.LinetypeTableId, OpenMode.ForRead) as LinetypeTable;
string sLineTypName = "Center";
if (acLineTypTbl.Has(sLineTypName) == true) { // Set the linetype Center current acCurDb.Celtype = acLineTypTbl[sLineTypName];
[CommandMethod("ChangeLinetypeDescription")] publicstaticvoidChangeLinetypeDescription() { // Get the current document and database Document acDoc = Application.DocumentManager.MdiActiveDocument; Database acCurDb = acDoc.Database; // Start a transaction using (Transaction acTrans = acCurDb.TransactionManager.StartTransaction()) { // Open the Linetype table record of the current linetype for write LinetypeTableRecord acLineTypTblRec; acLineTypTblRec = acTrans.GetObject(acCurDb.Celtype, OpenMode.ForWrite) as LinetypeTableRecord; // Change the description of the current linetype acLineTypTblRec.AsciiDescription = "Exterior Wall"; // Save the changes and dispose of the transaction acTrans.Commit(); } }
[CommandMethod("SetObjectLinetypeScale")] publicstaticvoidSetObjectLinetypeScale() { // Get the current document and database Document acDoc = Application.DocumentManager.MdiActiveDocument; Database acCurDb = acDoc.Database;
// Start a transaction using (Transaction acTrans = acCurDb.TransactionManager.StartTransaction()) { // Save the current linetype ObjectId acObjId = acCurDb.Celtype;
// Set the global linetype scale acCurDb.Ltscale = 3;
// Open the Linetype table for read LinetypeTable acLineTypTbl; acLineTypTbl = acTrans.GetObject(acCurDb.LinetypeTableId, OpenMode.ForRead) as LinetypeTable;
string sLineTypName = "Border";
if (acLineTypTbl.Has(sLineTypName) == false) { acCurDb.LoadLineTypeFile(sLineTypName, "acad.lin"); }
// Set the Border linetype current acCurDb.Celtype = acLineTypTbl[sLineTypName];
// Open the Block table for read BlockTable acBlkTbl; acBlkTbl = acTrans.GetObject(acCurDb.BlockTableId, OpenMode.ForRead) as BlockTable;
// Open the Block table record Model space for write BlockTableRecord acBlkTblRec; acBlkTblRec = acTrans.GetObject(acBlkTbl[BlockTableRecord.ModelSpace], OpenMode.ForWrite) as BlockTableRecord;
// Create a circle object and set its linetype // scale to half of full size using (Circle acCirc1 = new Circle()) { acCirc1.Center = new Point3d(2, 2, 0); acCirc1.Radius = 4; acCirc1.LinetypeScale = 0.5;
[CommandMethod("ListLayerStates")] publicstaticvoidListLayerStates() { // Get the current document and database Document acDoc = Application.DocumentManager.MdiActiveDocument; Database acCurDb = acDoc.Database;
// Start a transaction using (Transaction acTrans = acCurDb.TransactionManager.StartTransaction()) { LayerStateManager acLyrStMan; acLyrStMan = acCurDb.LayerStateManager;
DBDictionary acDbDict; acDbDict = acTrans.GetObject(acLyrStMan.LayerStatesDictionaryId(true), OpenMode.ForRead) as DBDictionary;
[CommandMethod("RemoveLayerState")] publicstaticvoidRemoveLayerState() { // Get the current document Document acDoc = Application.DocumentManager.MdiActiveDocument;
[CommandMethod("ExportLayerState")] publicstaticvoidExportLayerState() { // Get the current document Document acDoc = Application.DocumentManager.MdiActiveDocument;
[CommandMethod("ImportLayerState")] publicstaticvoidImportLayerState() { // Get the current document Document acDoc = Application.DocumentManager.MdiActiveDocument;
[CommandMethod("CreateMText")] publicstaticvoidCreateMText() { // Get the current document and database Document acDoc = Application.DocumentManager.MdiActiveDocument; Database acCurDb = acDoc.Database;
// Start a transaction using (Transaction acTrans = acCurDb.TransactionManager.StartTransaction()) { // Open the Block table for read BlockTable acBlkTbl; acBlkTbl = acTrans.GetObject(acCurDb.BlockTableId, OpenMode.ForRead) as BlockTable;
// Open the Block table record Model space for write BlockTableRecord acBlkTblRec; acBlkTblRec = acTrans.GetObject(acBlkTbl[BlockTableRecord.ModelSpace], OpenMode.ForWrite) as BlockTableRecord;
// Create a multiline text object using (MText acMText = new MText()) { acMText.Location = new Point3d(2, 2, 0); acMText.Width = 4; acMText.Contents = "This is a text string for the MText object.";
[CommandMethod("FormatMText")] publicstaticvoidFormatMText() { // Get the current document and database Document acDoc = Application.DocumentManager.MdiActiveDocument; Database acCurDb = acDoc.Database;
// Start a transaction using (Transaction acTrans = acCurDb.TransactionManager.StartTransaction()) { // Open the Block table for read BlockTable acBlkTbl; acBlkTbl = acTrans.GetObject(acCurDb.BlockTableId, OpenMode.ForRead) as BlockTable;
// Open the Block table record Model space for write BlockTableRecord acBlkTblRec; acBlkTblRec = acTrans.GetObject(acBlkTbl[BlockTableRecord.ModelSpace], OpenMode.ForWrite) as BlockTableRecord;
// Create a multiline text object using (MText acMText = new MText()) { acMText.Location = new Point3d(2, 2, 0); acMText.Width = 4.5; acMText.Contents = "{{\\H1.5x; Big text}\\A2; over text\\A1;/\\A0;under text}";
[CommandMethod("CreateText")] publicstaticvoidCreateText() { // Get the current document and database Document acDoc = Application.DocumentManager.MdiActiveDocument; Database acCurDb = acDoc.Database;
// Start a transaction using (Transaction acTrans = acCurDb.TransactionManager.StartTransaction()) { // Open the Block table for read BlockTable acBlkTbl; acBlkTbl = acTrans.GetObject(acCurDb.BlockTableId, OpenMode.ForRead) as BlockTable;
// Open the Block table record Model space for write BlockTableRecord acBlkTblRec; acBlkTblRec = acTrans.GetObject(acBlkTbl[BlockTableRecord.ModelSpace], OpenMode.ForWrite) as BlockTableRecord;
// Create a single-line text object using (DBText acText = new DBText()) { acText.Position = new Point3d(2, 2, 0); acText.Height = 0.5; acText.TextString = "Hello, World.";
[CommandMethod("ObliqueText")] publicstaticvoidObliqueText() { // Get the current document and database Document acDoc = Application.DocumentManager.MdiActiveDocument; Database acCurDb = acDoc.Database;
// Start a transaction using (Transaction acTrans = acCurDb.TransactionManager.StartTransaction()) { // Open the Block table for read BlockTable acBlkTbl; acBlkTbl = acTrans.GetObject(acCurDb.BlockTableId, OpenMode.ForRead) as BlockTable;
// Open the Block table record Model space for write BlockTableRecord acBlkTblRec; acBlkTblRec = acTrans.GetObject(acBlkTbl[BlockTableRecord.ModelSpace], OpenMode.ForWrite) as BlockTableRecord;
// Create a single-line text object using (DBText acText = new DBText()) { acText.Position = new Point3d(3, 3, 0); acText.Height = 0.5; acText.TextString = "Hello, World.";
// Change the oblique angle of the text object to 45 degrees(0.707 in radians) acText.Oblique = 0.707;
[CommandMethod("TextAlignment")] publicstaticvoidTextAlignment() { // Get the current document and database Document acDoc = Application.DocumentManager.MdiActiveDocument; Database acCurDb = acDoc.Database;
// Start a transaction using (Transaction acTrans = acCurDb.TransactionManager.StartTransaction()) { // Open the Block table for read BlockTable acBlkTbl; acBlkTbl = acTrans.GetObject(acCurDb.BlockTableId, OpenMode.ForRead) as BlockTable;
// Open the Block table record Model space for write BlockTableRecord acBlkTblRec; acBlkTblRec = acTrans.GetObject(acBlkTbl[BlockTableRecord.ModelSpace], OpenMode.ForWrite) as BlockTableRecord;
[CommandMethod("BackwardsText")] publicstaticvoidBackwardsText() { // Get the current document and database Document acDoc = Application.DocumentManager.MdiActiveDocument; Database acCurDb = acDoc.Database;
// Start a transaction using (Transaction acTrans = acCurDb.TransactionManager.StartTransaction()) { // Open the Block table for read BlockTable acBlkTbl; acBlkTbl = acTrans.GetObject(acCurDb.BlockTableId, OpenMode.ForRead) as BlockTable;
// Open the Block table record Model space for write BlockTableRecord acBlkTblRec; acBlkTblRec = acTrans.GetObject(acBlkTbl[BlockTableRecord.ModelSpace], OpenMode.ForWrite) as BlockTableRecord;
// Create a single-line text object using (DBText acText = new DBText()) { acText.Position = new Point3d(3, 3, 0); acText.Height = 0.5; acText.TextString = "Hello, World.";
// Display the text backwards acText.IsMirroredInX = true;
You can also update existing text of that style type to reflect the changes. Use the following properties to modify a TextStyleTableRecord object: 您还可以更新该样式类型的现有文本以反映更改。使用以下属性修改 TextStyleTableRecord 对象:
[CommandMethod("UpdateTextFont")] publicstaticvoidUpdateTextFont() { // Get the current document and database Document acDoc = Application.DocumentManager.MdiActiveDocument; Database acCurDb = acDoc.Database; // Start a transaction using (Transaction acTrans = acCurDb.TransactionManager.StartTransaction()) { // Open the current text style for write TextStyleTableRecord acTextStyleTblRec; acTextStyleTblRec = acTrans.GetObject(acCurDb.Textstyle, OpenMode.ForWrite) as TextStyleTableRecord; // Get the current font settings Autodesk.AutoCAD.GraphicsInterface.FontDescriptor acFont; acFont = acTextStyleTblRec.Font; // Update the text style's typeface with "PlayBill" Autodesk.AutoCAD.GraphicsInterface.FontDescriptor acNewFont; acNewFont = new Autodesk.AutoCAD.GraphicsInterface.FontDescriptor("PlayBill", acFont.Bold, acFont.Italic, acFont.CharacterSet, acFont.PitchAndFamily); acTextStyleTblRec.Font = acNewFont; acDoc.Editor.Regen(); // Save the changes and dispose of the transaction acTrans.Commit(); } }
[CommandMethod("ChangeFontFiles")] publicstaticvoidChangeFontFiles() { // Get the current document and database Document acDoc = Application.DocumentManager.MdiActiveDocument; Database acCurDb = acDoc.Database;
// Start a transaction using (Transaction acTrans = acCurDb.TransactionManager.StartTransaction()) { // Open the current text style for write TextStyleTableRecord acTextStyleTblRec; acTextStyleTblRec = acTrans.GetObject(acCurDb.Textstyle, OpenMode.ForWrite) as TextStyleTableRecord;
// Change the font files used for both Big and Regular fonts acTextStyleTblRec.BigFontFileName = "C:/AutoCAD/Fonts/bigfont.shx"; acTextStyleTblRec.FileName = "C:/AutoCAD/Fonts/italic.shx";
// Save the changes and dispose of the transaction acTrans.Commit(); } }