
25建筑
建筑
本章介绍特定于Revit建筑功能的API功能:
- 与房间相关的功能(Element.Room、RoomTag等)
本节中的主题
- Rooms
房间
Rooms
以下各节介绍了有关房间类、其参数以及如何在API中使用房间类的信息。
Room类用于表示房间和图元,例如房间明细表和面积平面。下表列出了API中不同房间、面积及其对应标签的属性和创建函数:
表55:房间、面积和标签关系
| **Element ** | **Class ** | **Category ** | **Boundary ** | **Location ** | **Can Create ** |
|---|---|---|---|---|---|
| Room in Plan View | Room | OST_Rooms | 在封闭区域中有 | LocationPoint | NewRoom(),NewRoom(Phase)除外 |
| Room in Schedule View | Room | OST_Rooms | Null | Null | NewRoom(Phase) |
| Area | Room | OST_Areas | 总是有 | LocationPoint | No |
| Room Tag | RoomTag | OST_RoomTags | LocationPoint | Creation.Document.NewRoomTag() | |
| Area Tag | FamilySymbol | OST_AreaTags | LocationPoint | No |
注:房间名称是房间名称和房间号的组合。例如,对于编号为2且名称为“Master Bedroom”的房间,Room.Name将返回“Master Bedroom 2”。使用ROOM_NAME内置参数获取房间名称。
注意:作为注释元素,特定视图可使用RoomTag. View。不要尝试设置RoomTag.Name属性,因为该名称是自动分配的;否则将引发异常。
创建房间
下面的代码演示了在特定楼层的某个点创建房间的最简单方法:
代码区域28-1:创建房间
1 | Room CreateRoom(Autodesk.Revit.DB.Document document, Level level) |
可以在房间明细表中创建房间,然后将其插入到平面回路中。
- Document.NewRoom(Phase)方法用于创建不与任何特定位置关联的新文件室,并将其插入到现有明细表中。在拨打电话之前,确保房间时间表存在或在指定阶段创建房间时间表。
- Document.NewRoom(Roomroom,PlanCircuit线路)方法用于从明细表中的房间和PlanCircuit创建房间。
- 输入房间必须仅存在于房间明细表中,这意味着它不会显示在任何平面视图中。
- 调用该方法后,将在PlanCircuit所在的视图中创建具有相同名称和编号的模型房间。
有关平面电路的详细信息,请参见平面拓扑。
以下代码说明了整个过程:
代码区域28-2:创建房间并将其插入到平面回路中
1 | Room InsertNewRoomInPlanCircuit(Autodesk.Revit.DB.Document document, Level level, Phase newConstructionPhase) |
创建房间并将其添加到位置后,可以使用Room.Unplace()方法将其从该位置删除(但在项目中仍然可用)。然后可以将其放置在新的位置。
房间边界
房间的边界可在房间所在的位置创建封闭区域。
- 边界包括以下要素:
- Walls
- Model lines
- Columns
- Roofs
检索房间边界
房间周围的边界是从基类方法SpatialElement.GetBoundarySegments()获得的。当房间不在封闭区域中或仅存在于明细表中时,该方法返回null。每个房间可能有几个区域,每个区域都有几个段,因此数据以BoundarySegment列表的形式返回。
下图显示了在Revit UI中选择的房间边界:
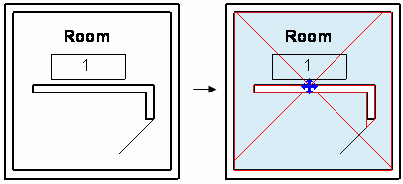
图138:房间边界
线段列表的大小取决于封闭区域拓扑。每个BoundarySegment列表都创建一个回路或一条连续的线,其中一个线段连接到下一个线段。下面的图片提供了几个例子。在下面的图片中,所有墙都是“房间边界”,模型线类别为OST_AreaSeparationLines。如果某个图元不是“房间边界”,则将其从图元中排除以形成边界。
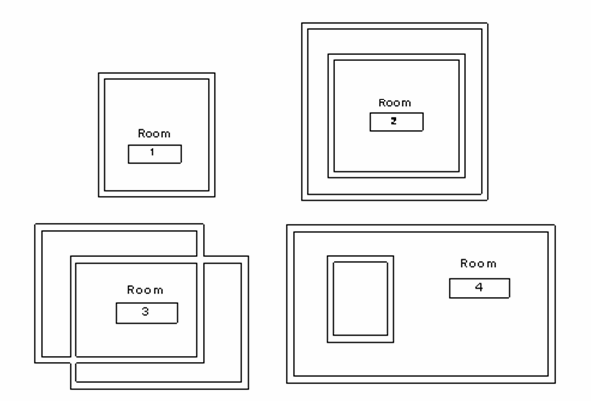
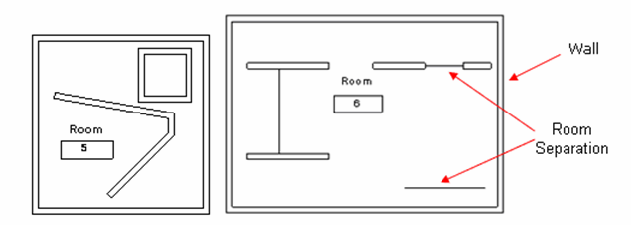
下表提供了之前房间的Room.GetBoundarySegments().Size结果:
表56:Room.GetBoundarySegments().Size
| Room 房间 | **Room.GetBoundarySegments().Size ** |
|---|---|
| Room 1、2、3 | 1 |
| Room 4 | 2 |
| Room 5、6 | 3 |
注意:由模型线连接的墙被视为连续的线段。单个模型线将被忽略。
获取IList<IList
BoundarySegment
构成区域的线段由BoundarySegment类表示;其ElementId属性返回对应元素的id,条件如下:
- 对于ModelCurve元素,类别必须是BuiltInCategory.OST_AreaSeparationLines,这意味着它表示房间分隔符。
- 对于墙、柱和屋顶等其他图元,如果图元是房间边界,则“房间边界”参数(BuiltInParameter.WALL_ATTR_ROOM_BOUNDING)必须为真,如下图所示。

图141:房间边界属性
WALL_ATTR_ROOM_BOUNDING内置参数通过API设置:
代码区域28-3:设置房间边界
1 | public void SetRoomBounding(Wall wall) |
请注意,在下面的图片中,屋顶如何形成房间的BoundarySegment。第一张图片显示立面视图中的Level 3。将在Level 3楼层视图中创建房间。后两张图片显示了房间和房子的3D视图的边界。
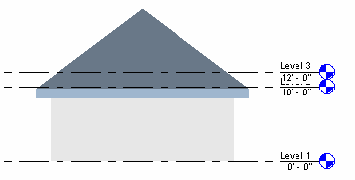
图142:在标高3视图中创建的房间
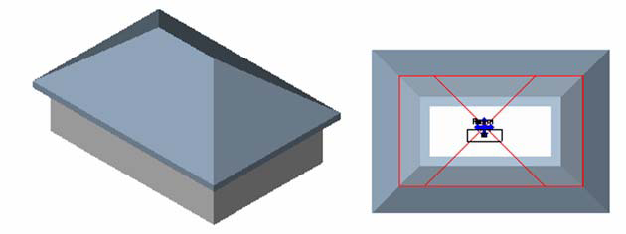
图143:屋顶形成的房间边界
面积边界只能是类别为面积边界(BuiltInCategory.OST_AreaSchemeLines)的ModelCurve,而显示房间的边界可以是墙和其他图元。
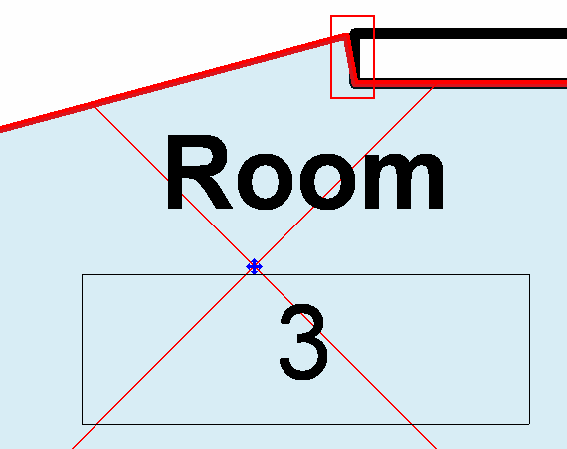
图144:墙端边缘
如果BoundarySegment对应于房间分隔和墙之间的曲线,如上图所示:
- Element属性返回null
- 曲线不为空。
边界与事务
在使用API创建了一个元素(如墙)之后,如果调用Room.GetBoundarySegments(),墙可以更改房间边界。您必须确保数据已更新。
下图显示了使用Revit Platform API创建墙后房间的变化。
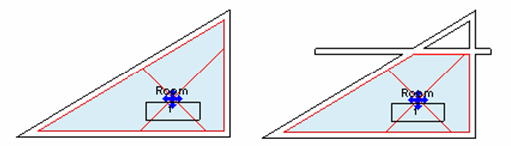
图145:添加的墙更改房间边界
要更新房间边界数据,请使用以下代码中的事务机制:
1 | public void UpdateRoomBoundary(UIApplication application, Room room, Level level) |
有关详细信息,请参阅事务。
平面拓扑
房间所在的标高平面具有由墙和房间分隔线等图元构成的拓扑。PlanTopology和PlanCircuit类用于表示标高拓扑。
- 使用Level从Document对象获取PlanTopology对象。在每个平面视图中,每个阶段对应一个PlanTopology。
- 相同的条件适用于BoundarySegment,但房间分隔符和房间边界参数为true的元素可以是PlanCircuit中的边(边界)。
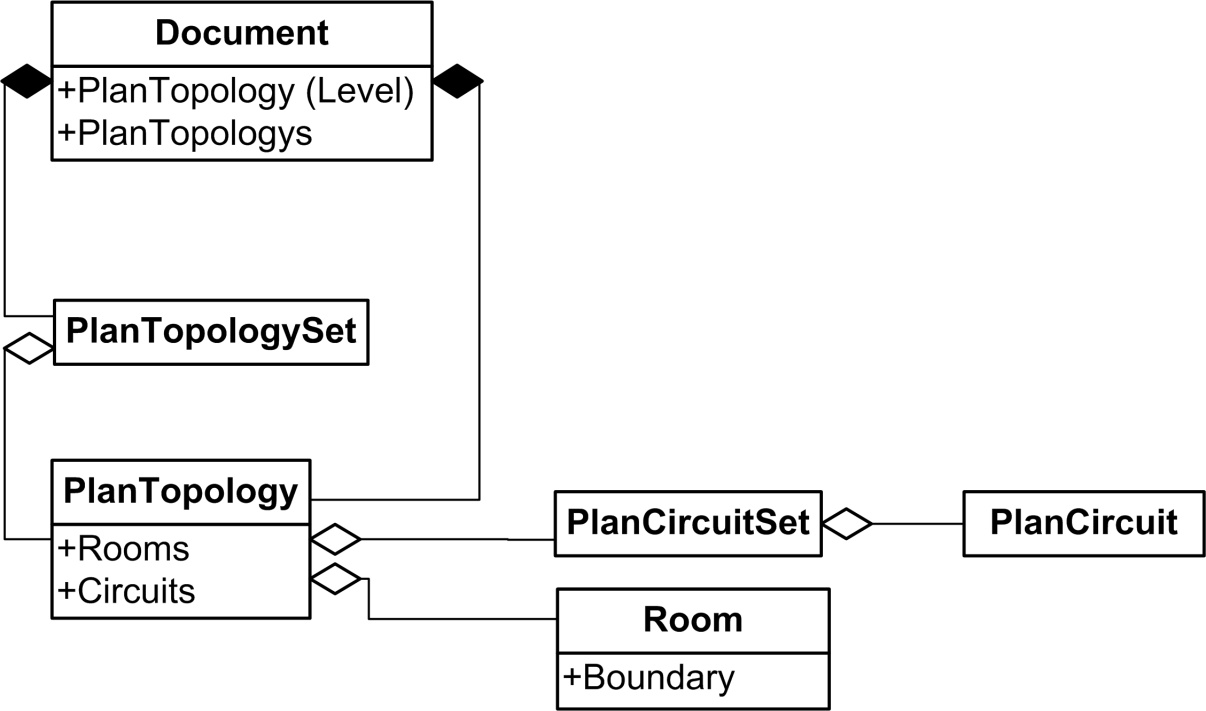
图146:房间和平面拓扑图
PlanCircuit.Sideship属性返回线路边编号,而SpatialElement.GetBoundarySegments()返回IList<IList<Autodesk.Revit.DB.BoundarySegment>,其Count与线路边编号不同。
- 如果墙上有分支,则SpatialElement.GetBoundarySegments()将底墙识别为两面墙。
- PlanCircuit.无论分支的数量如何,Sideball总是将图片中的底墙视为一个。
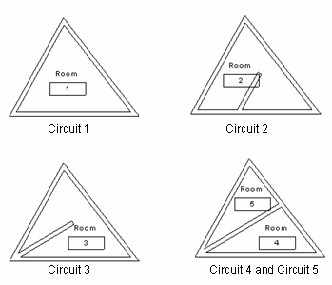
图147:比较房间边界与PlanCircuit
表57:房间边界与平面回路的比较
| **Circuit ** | Circuit.SideNum | **IList<IList<Autodesk.Revit.DB.BoundarySegment> .Count for Room ** |
|---|---|---|
| Circuit 1 | 3 | 3 (Room1) |
| Circuit 2 | 4 +2 = 6 | 4 +3 = 7 (Room2) |
| Circuit 3 | 3 +2 = 5 | 3 +3 = 6 (Room3) |
| Circuit 4 | 3 | 3 (Room4) |
| Circuit 5 | 3 | 3 (Room5) |
房间和族实例
“门”和“窗”是与“房间”相关的特殊族实例。这里只讨论门,因为唯一的区别是窗户没有翻转把手。
以下特性适用于门:
- 门元素可以在没有房间的情况下存在。
- 在API中(仅在API中),Door元素具有两个附加属性,它们引用门的两个相对侧上的区域:ToRoom和FromRoom
- 如果区域是房间,则属性的值将是房间元素。
- 如果区域不是房间,则属性将返回null。两个属性可以同时为null。
- 门打开的一侧的区域将是ToRoom。另一边的房间将是FromRoom。
- 每当相应的区域发生变化时,这两个属性都会动态更新。
在下面的图片中,五扇门插入到墙中,而不翻转饰面。该表列出了每个门的FromRoom、ToRoom和Room属性。房间属性属于所有族实例。
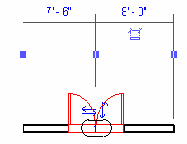
Figure 148: Door 1

Figure 149: Door 2
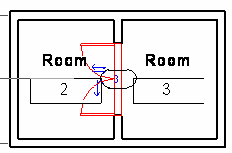
Figure 150: Door 3
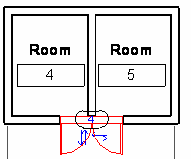
Figure 151: Door 4

Figure 152: Door 5
表58:门属性
| **Door ** | FromRoom | ToRoom | Room 房间 |
|---|---|---|---|
| Door 1 | null | null | null |
| Door 2 | Room 1 | null | null |
| Door 3 | Room 3 | Room 2 | Room 2 |
| Door 4 | Room 4 | null | null |
| Door 5 | null | Room 6 | Room 6 |
所有族实例都具有“房间”属性,该属性是实例在上一个项目阶段中所在的房间。窗户和门都面对着一个房间。通过翻转门或窗的朝向或调用FamilyInstance.FlipFromToRoom()来更改房间。对于其他类型的实例(如梁和柱),“房间”是与实例具有相同边界的房间。
下面的代码演示了如何从族实例中获取Room。需要检查结果是否为null。
代码区域28-5:从族实例获取房间
1 | public void GetRoomInfo(FamilyInstance familyInstance) |
其他房间属性
Room类还有其他几个属性,可用于获取有关对象的信息。房间具有以下只读尺寸属性:
- Area
- Perimeter
- UnboundedHeight
- Volume
- ClosedShell
此示例显示选定房间的尺寸标注信息。请注意,必须启用体积计算设置,否则房间体积将返回为0。
代码区域28-6:获取房间的尺寸
1 | public void GetRoomDimensions(Document doc, Room room) |
房间(或空间)的ClosedShell属性是由房间开放空间的边界(墙、楼板、天花板、屋顶和边界线)形成的几何图形。如果需要检查模型中的其他物理图元与房间的交点,例如,查看图元的一部分或全部是否位于房间中,则此属性非常有用。有关示例,请参见随Revit SDK提供的RoofsRooms示例应用程序,其中ClosedShell用于检查房间是否垂直无边界。
此外,还可以获取或设置具有以下属性的房间的基准偏移和限制偏移:
- BaseOffset
- LimitOffset
可以使用UpperLimit属性获取或设置定义房间上限的标高。