
12墙、楼板、天花板、屋顶和洞口
墙、楼板、天花板、屋顶和洞口
元素和表示内置位置构造的相应ElementType。
以下部分介绍与内置位置构造(如墙、楼板、天花板、屋顶和洞口)相关的类及其相应的属性。
本节中的页面
- 墙
- 楼板、天花板和基础
- 屋顶
- 幕墙
- 其他元素
- 复合结构
- 洞口
- 热属性
墙
WallType.Kind枚举表示四种墙:
- Stacked 叠层墙
- Curtain 幕墙
- Basic 基本
- Unknown 未知
Wall和WallType类与基本墙类型一起使用,同时为叠层墙和幕墙提供有限的功能。有时您需要检查墙以确定墙类型。例如,不能使用API从叠层墙获取子墙。WallKind是只读的,由系统系列设置。
Wall.Flipped属性和Wall.flip()方法可以访问和控制墙的方向。在下面的示例中,将在调用flip()方法之前和之后比较Wall。
- 之前的Orientation属性为(0.0,1.0,0.0)。
- 翻转调用后的Orientation属性为(0.0,-1.0,0.0)。
- “墙定位线(WALL_KEY_REF_PARAM)”参数为3,表示下表中的“饰面:内部”。
- 以该线为参照,墙将被移动,但“位置”不会更改。

图33:原始墙

图34:翻转后的墙
表24:墙位置线
| Location Line Value 定位线值 | Description 描述 |
|---|---|
| 0 | 墙中心线 |
| 1 | 核心层中心线 |
| 2 | 表面:外部 |
| 3 | 表面:内部 |
| 4 | 核心面:外部 |
| 5 | 核心面:内部 |
Wall类中有五个静态覆盖方法可用于创建Wall:
表25:Create()重载
| Name 名称 | Description 描述 |
|---|---|
| Create(Document, Curve, WallType, Level, Double, Double, Boolean, Boolean) | 使用指定的墙类型、高度和偏移在项目中创建新的矩形轮廓墙。 |
| Create(Document, IList Curve , Boolean) | 使用默认墙样式在项目中创建非矩形轮廓墙。 |
| Create(Document, Curve, ElementId, Boolean) | 使用默认墙样式在项目中由ElementId指定的标高上创建新的矩形轮廓墙。 |
| Create(Document, IList Curve , ElementId, ElementId, Boolean) | 使用指定的墙类型在项目中创建非矩形轮廓墙。 |
| Create(Document, IList Curve , ElementId, ElementId, Boolean, XYZ) | 使用指定的墙类型和法向量在项目中创建非矩形轮廓墙。 |
WallType墙功能(WALL_ATTR_EXTERIOR)参数会影响创建的墙实例“房间边界和结构用途”参数。WALL_ATTR_EXTERIOR值是一个整数:
表26:墙功能
| Wall Function 墙功能 | Interior 内部 | Exterior 外部 | Foundation 基础墙 | Retaining 挡土墙 | Soffit 檐底板 |
|---|---|---|---|---|---|
| Value 值 | 0 | 1 | 2 | 3 | 4 |
以下规则适用于由API创建的墙:
- 如果输入结构参数为true或Wall Function(WALL_ATTR_EXTERIOR)参数为Foundation,则Wall StructuralUsage参数为Bearing;否则为NonBearing。
- 如果墙功能(WALL_ATTR_EXTERIOR)参数为“Retaining”,则创建的墙房间边界(WALL_ATTR_ROOM_BOUNDING)参数为false。
有关与结构相关的函数(如AnalyticalModel属性)的详细信息,请参见结构工程。
楼板、天花板和基础
与楼板、天花板和基础关联的类。
楼板、天花板和基础相关的API项目包括:
表28:API中的地板、天花板和基础
| Object 对象 | Element Type 元素类型 | ElementType Type ElementType类型 | Element Creation 元素创建 | Other 其他 |
|---|---|---|---|---|
| Floor | Floor | FloorType | NewFloor()/NewSlab() | FloorType.IsFoundationSlab = false |
| Slab | Floor | FloorType | NewSlab() | FloorType.IsFoundationSlab = false |
| Ceiling | Ceiling | CeilingType | No | Category = OST_Ceilings |
| Wall Foundation | WallFoundation | WallFoundationType | No | Category = OST_StructuralFoundation |
| Isolated Foundation | FamilyInstance | FamilySymbol | NewFamilyInstance() | Category = OST_StructuralFoundation |
| Foundation Slab | Floor | FloorType | NewFloor() | Category = OST_StructuralFoundation FloorType.IsFoundationSlab = true |
注意:Floor和Ceiling派生自CeilingAndFloor类。以下规则适用于Floor:
- 从基础设计栏创建的元素具有相同的类别OST_StructuralFoundation,但对应于不同的类。
- FloorType IsFoundationSlab属性将FloorType类别设置为OST_StructuralFoundation或不设置。
检索FloorType以使用NewFloor创建楼板或基础底板时,请使用以下方法:
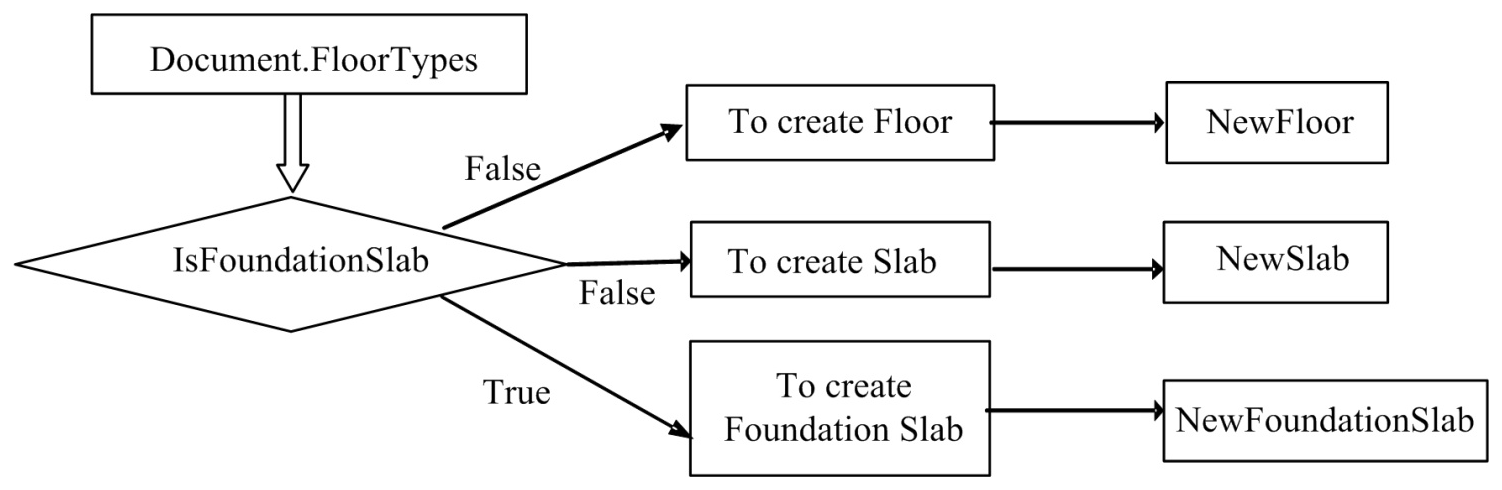
图35:创建基础和楼板
当前,API不提供对Floor类中的地板坡度箭头的访问。但是,在使用Revit的结构功能时,可以使用NewSlab()创建斜板:
代码区域11-1:NewSlab()
1 | public Floor NewSlab(CurveArray profile, Level level, Line slopedArrow, double slope,bool isStructural); |
使用slopedArrow参数创建坡度箭头。
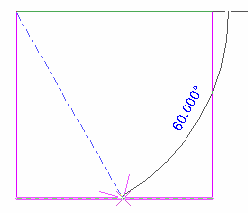
图36:NewSlab中的slopedArrow参数
NewSlab()中斜率参数的单位是rise/run。
Floor.FloorType属性是使用Floor.GetTypeId()方法的替代方法。有关与结构相关的成员(如GetSpanDirectionSymbolIds()方法和SpanDirectionAngle属性)的详细信息,请参见结构工程部分。
在Revit中编辑独立基础时,可以执行以下操作:
- 您可以选取宿主,例如楼板。但是,FamilyInstance对象Host属性始终返回null。
- 删除宿主楼板时,基础不会随之删除。
- Foundation 宿主可通过Host(MANANCE_FREE_HOST_PARAM)参数访问。
- 使用另一个相关的“偏移”(Offset_FREE_HOST_OFFSET_PARAM)参数控制宿主元素的基础偏移。
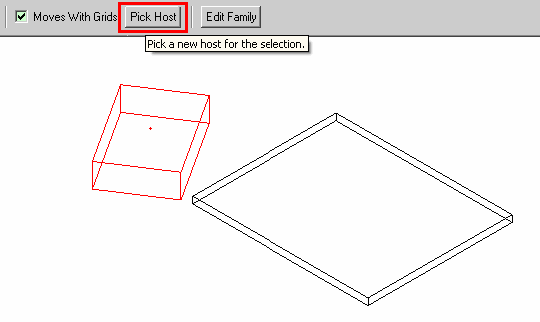
图37:为FoundationSlab(FamilyInstance)选择宿主
条形基础由API中的WallFoundation类表示。API提供对WallFoundation和WallFoundationType的有限访问,但使用GetAnalyticalModel()方法时除外(请参阅“结构工程”部分中的分析模型)。例如,附着的墙不能用于Revit的建筑功能。使用Revit的结构功能,可以使用AnalyticalModel类中的GetAnalyticalModelSupports()方法显示Wall类和WallFoundation类之间的关系。有关详细信息,请参见“结构工程”部分中的分析模型。
修改板
您可以使用SlabShapeEditor类修改基于板的元素的形式。此类允许您:
- 操作选定的基于板的元素上的一个或多个点或边
- 在元素上添加点以更改元素的几何图形
- 添加线性边并将板的现有面拆分为更小的子面域
- 删除形状修改器并将图元几何图形重置回未修改的形状。
下面是将选定的已修改地板恢复为其原始形状的示例:
代码区域11-2:恢复板的形状
1 | private void ResetSlabShapes(Autodesk.Revit.DB.Document document) |
有关使用SlabShapeEditor和相关类的详细示例,请参见Revit SDK中包含的SlabShapeEditing示例应用程序。
屋顶
Revit API中屋顶的表示。
Revit Platform API中的屋顶均派生自RoofBase对象。有两个类:
- FootPrintRoof -表示由建筑物迹线区构成的屋顶
- ExtrusionRoof -表示由拉伸轮廓制成的屋顶
两者都有一个RoofType属性,用于获取或设置屋顶的类型。此示例说明如何基于某些选定的墙创建迹线屋顶:
代码区域11-3:创建迹线屋顶
1 | // Before invoking this sample, select some walls to add a roof over. |
有关如何创建ExtrusionRoof的示例,请参见Revit API SDK附带的NewRoof示例应用程序。
天沟、筋膜檐沟和封檐带图元派生自表示屋顶的HostedSweep类。可以通过API创建、删除或修改它们。若要创建这些元素,请使用Document.Create.NewFascia()或Document.Create.NewGutter()重写之一。有关如何创建新檐沟和封檐带的示例,请参见SDK示例中包含的NewHostedSweep应用程序。下面是一个代码片段,显示了您可以修改gutter元素的属性。
代码区域11-4:修改天沟
1 | public void ModifyGutter(Autodesk.Revit.DB.Document document) |
幕墙
幕墙、幕墙系统和幕墙屋顶是CurtainGrid对象的主体图元。幕墙只能有一个CurtainGrid,而幕墙系统和幕墙屋顶可以包含一个或多个CurtainGrid。有关如何创建CurtainSystem的示例,请参见Revit SDK附带的CurtainSystem示例应用程序。有关创建幕墙并使用网格线填充幕墙的示例,请参见CurtainWallGrid示例应用程序。
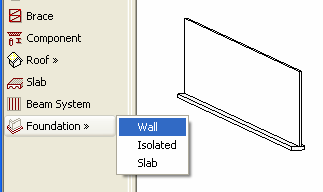
其他元素
有些元素不是HostObject(也没有特定的类),但它们是可以承载其他对象的特殊情况。例如,ramp及其关联的元素类型在API中没有特定的类,而是在OST_Ramp类别中表示为Element和ElementType。
复合结构
描述墙、楼板、屋顶或天花板的内部结构。
墙、楼板、天花板和屋顶都是API类HostObject的子对象。HostObject(及其相关类型类HostObjAttributes)提供对CompoundStructure的只读访问。复合结构由有序层的集合组成,对于墙来说,从外部到内部,或者对于地板,屋顶或天花板来说,从顶部到底部。这些层的属性决定了相关墙、楼板、屋顶或天花板的整体结构的厚度、材质和功能。
层可以通过GetLayers()方法访问,并使用SetLayers()完全替换。
通常,这些层是平行的,并以固定的层宽度延伸整个主体对象。然而,对于墙,结构也可以是“垂直复合”的,其中层在距墙的顶部和底部的指定垂直距离处变化。使用CompoundStructure.IsVerticallyCompound来标识它们。对于垂直复合结构,该结构通过矩形描述垂直截面,该矩形被划分为多边形区域,多边形区域的边都是垂直或水平段。映射将这些区域中的每一个与CompoundStructure中的层的索引相关联,该层的索引确定该区域的属性。
可以使用复合结构来找到不同层边界的几何位置。方法CompoundStructure.GetOffsetForLocationLine()提供从中心定位线到任何定位线选项(芯体中心线、任一侧的饰面面或芯体侧)的偏移。
有了到定位线的偏移,您可以从已知位置开始,使用CompoundStructure.GetLayerWidth()获取每个边界层的宽度,从而获取每个层边界的位置。
使用CompoundStructure的一些注意事项:
- 元素的总宽度是每个CompoundStructureLayer的宽度之和。您无法直接更改元素的总宽度,但可以通过更改CompoundStructureLayer宽度来更改它。指定的可变长度层的索引(如果已分配)可以从CompoundStructure.VariableLayerIndex获得。
- 必须将CompoundStructure设置回HostObjAttributes实例(使用HostObjAttributes.SetCompoundStructure()方法),以便存储任何更改。
- 对HostObjAttributes的更改会影响当前文档中的每个实例。如果需要新的层组合,则需要创建新的HostObjAttributes(使用ElementType.Duplicate())并将新的CompoundStructure分配给它。
- CompoundStructureLayer DeckProfileId和DeckEmbeddingType属性仅适用于Revit结构要素中的Slab。有关详细信息,请参阅结构工程。
材质
HostObjAttributes中的每个CompoundStructureLayer通常与某种类型的材质一起显示。如果CompoundStructureLayer.MaterialId返回-1,则表示该Material与Category相关。有关详细信息,请参阅材料。获取CompoundStructureLayer材质的示例代码如下:
代码区域11-5:获取CompoundStructureLayer材质
1 | public void GetWallLayerMaterial(Autodesk.Revit.DB.Document document, Wall wall) |
有时只需要“结构”层的材料。与其在每个层中查找其函数为MaterialFunctionAssignment.Structure的层,不如使用CompoundStructure.StructuralMaterialIndex属性查找其材料定义了类型的结构属性的层的索引,以便进行分析。
注意:调用SetLayers()时,StructuralMaterialIndex值将被清除,需要重置。
洞口
在Revit Platform API中,Opening对象派生自Element对象,并包含所有Element对象属性和方法。若要检索项目中的所有Openings,请使用Document.ElementIterator查找Elements.Opening对象。
常规属性
本节说明如何使用洞口属性。
Isolation Boundary-确定洞口是否具有矩形边界。
- 如果为true,则表示Opening具有矩形边界,并且可以从Opening BoundaryRect属性获取IList集合。否则,属性返回null。
- 如果为false,则可以从BoundaryCurves属性获取CurveArray对象。
BoundaryCurves -如果开口边界不是矩形,则此属性检索几何信息;否则返回null。该属性返回一个CurveArray对象,其中包含表示Opening对象边界的曲线。有关曲线的更多详细信息,请参阅几何体。
BoundaryRect -如果开口边界是矩形,则可以使用此属性获取几何信息;否则返回null。
- 该属性返回一个包含XYZ坐标的IList集合。
- IList集合通常包含矩形边界的最小(左下)和最大(右上)坐标。
Host -host属性检索Opening host元素。主体图元是由Opening对象剪切的图元。
注意:如果洞口对象的类别为竖井洞口,则洞口主体为空。
下面的示例说明如何检索现有的Opening属性。
代码区域11-6:检索现有洞口属性
1 | private void Getinfo_Opening(Opening opening) |
创建洞口
在Revit Platform API中,使用Document.NewOpening()方法在项目中创建洞口。有四种方法重载可用于在不同的宿主元素中创建洞口:
代码区域11-7:NewOpening()
1 | //Create a new Opening in a beam, brace and column. |
1 | //Create a new Opening in a roof, floor and ceiling. |
1 | //Create a new Opening Element. |
1 | //Create an opening in a straight wall or arc wall. |
- 在梁、支撑或柱中创建洞口-用于在族实例中创建洞口。iFace参数指示放置洞口的面。
- 创建屋顶、楼板或天花板洞口-用于在屋顶、楼板或天花板中创建洞口。
- bPerceptiularFace参数指示洞口是垂直于面还是垂直于面。
- 如果该参数为true,则洞口垂直于主体图元面。请参见下图:
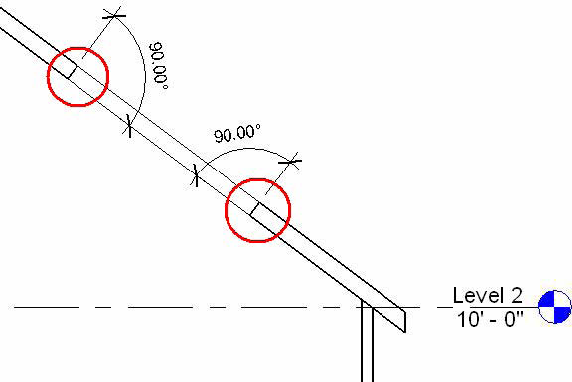
图40:垂直于主体元素切割的开口
- 创建新洞口图元-用于在项目中创建竖井洞口。但是,请确保topLevel高于bottomLevel;否则将引发异常。
- 在直墙或弧形墙中创建洞口-用于在墙中创建矩形洞口。pntStart和pntEnd的坐标应该是可以塑造矩形的角坐标。例如,矩形的左下角和右上角。否则会引发异常。
注意:使用“洞口”命令只能创建矩形墙洞口。要在墙上创建一些孔,请编辑墙轮廓而不是“洞口”命令。
热属性
某些部件类型(如墙、楼板、天花板、屋顶和建筑地坪)具有计算和可设置的热属性,这些热属性由ThermalProperties类表示。

hermalProperties类具有上面显示的值的属性。吸收率和粗糙度是可修改的,而传热系数、热阻和热质量是只读的。这些计算值的单位如下表所示。
| Property 属性 | Unit 单位 |
|---|---|
| HeatTransferCoefficient 导热系数 | watts per meter-squared kelvin (W/(m^2K) |
| ThermalResistance 热阻 | meter-squared kelvin per watt ((m^2K)/Watt) |
| ThermalMass 热质量 | kilogram feet-squared per second squared kelvin (kg ft^2/(s^2 K)) |
可以使用以下类型的ThermalProperties属性检索热属性:
- WallType
- FloorType
- CeilingType
- RoofType
- BuildingPadType